|
|
|
|
|
|
|
|
|
 Posted: Fri Apr 24, 2009 3:26 pm Posted: Fri Apr 24, 2009 3:26 pm
Do anyone have a recipe that their willing release post it here
My recipe
Chocolate Pancakes
I use the standard ingrediants
but replace the milk with chocolate milk
add bittersweet chocolate chips
and a touch of vanilla extract
Pure deliciousness
|
 |
|
|
|
|
|
|
|
|
|
|
|
|
|
Posted: Tue May 26, 2009 2:47 pm
I got a recipe from Taste of Home magazine for a soup that's SOOOO good. It's really easy and pretty cheap to make too.
Dilly Cheese Soup (for 6 servings (can very easily be doubled))
4-1/2 cups water
4 medium potatoes, peeled and cubed
1/2 cup uncooked long grain rice
3 to 4 tablespoons minced fresh dill
2 tablespoons chopped onion
1 to 2 chicken bouillon cubes
1/4 teaspoon salt
1/4 teaspoon pepper
8 ounces process American cheese (Velveeta), cubed
1/2 cup sour cream
Directions:
In a soup kettle or Dutch oven, combine the first eight ingredients; bring to a boil. Reduce heat; cover and simmer for 15 minutes or until potatoes are tender. Add the cheese and sour cream; heat and stir just until cheese is melted (do not boil). Yield: 6-8 servings (2 quarts). Editor's Note: Recipe can be easily doubled.
|
|
|
|
|
|
|
|
|
|
|
|
|
|
|
|
|
|
Posted: Mon Jun 15, 2009 12:16 pm
Butter Chicken! I use this recipe: Butter ChickenInstead of frying the chicken in the method given, I poach it. HOW TO POACH CHICKEN: This method yields the texture you need to make shredded chicken. You can flavour shredded chicken in so many ways! Use it for tacos or a salad! Of course here it's for the butter chicken. Add it at the same spot they recommend adding the chicken in the video! Take a pot with a lid. Put the chicken pieces in the bottom. Cover the chicken with water, just to the top of the meat. Toss in a little salt and pepper to taste. Bring to a boil! Cover the pot with a lid and reduce the heat to low and leave it for about 15-20 minutes with the lid on. Remove from heat and shred with two forks on a cutting board or a plate! ENJOY!
|
|
|
|
|
|
|
|
|
|
|
|
|
|
|
Posted: Thu Jun 18, 2009 6:56 pm
From the Kitchen of:  lee formerly porth HI everyone! I have been making homemade jams for about 4 years now and everyone i know loves them. Canning and making jams is a dying art so i thought i would share this dying art with all who would like to give it a shot. i know that this seems like a lot of work and well i wont lie it is. but you can make it fun and if you have kids that are willing to help that makes it even more fun. and the end product is well worth it. you have delecious all natural jam. its much healthier than anything you can by in a store and much more fresh. lee formerly porth HI everyone! I have been making homemade jams for about 4 years now and everyone i know loves them. Canning and making jams is a dying art so i thought i would share this dying art with all who would like to give it a shot. i know that this seems like a lot of work and well i wont lie it is. but you can make it fun and if you have kids that are willing to help that makes it even more fun. and the end product is well worth it. you have delecious all natural jam. its much healthier than anything you can by in a store and much more fresh.
what you need to start:
Fruit - preferably fresh, but frozen (without syrup works, too)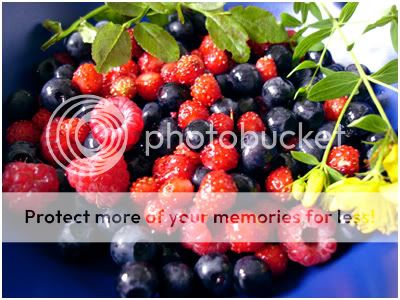
Pectin (it's a natural product, made from apples and available at grocery stores (season - spring through late summer) 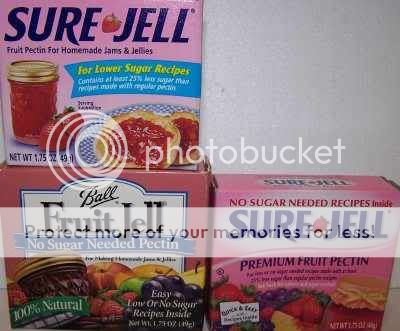
Jar funnel this is optional i personally dont bother with it but if you feel the need then by all means use it. 
Sugar - Anywhere from 4.5 to 8 cups of dry, granulated (table) sugar. depends on the berries being used. 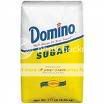
Jar grabber (to pick up the hot jars)- It's a tremendously useful to put jars in the canner and take the hot jars out (without scalding yourself!)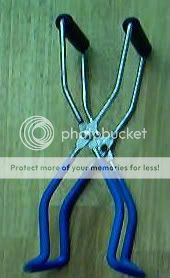
At least 1 large pot ; I prefer 16 to 20 quart Teflon lined pots for easy cleanup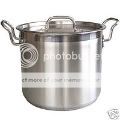
Large spoons and ladles 
1 Canner (a huge pot to sterilize the jars after filling) 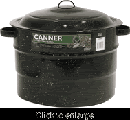
Ball jars to put jam in there are different sizes of jars. The most commonly used for jams are the pint and half pints. If you really like jam and know you will finish a jar quickly then you can also use a quart size. I find that the half pint jars are perfect for gifts. 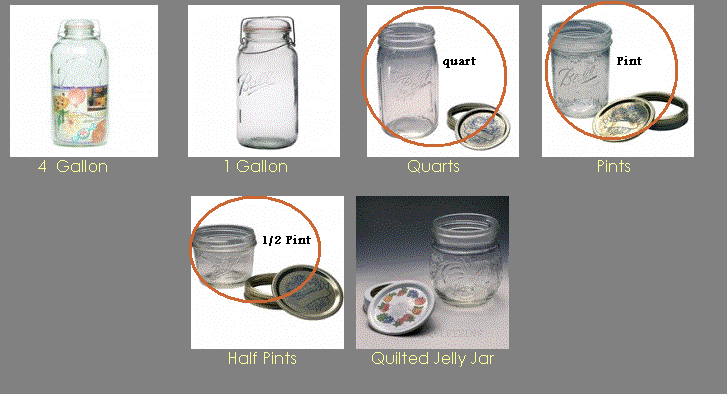
Lids - thin, flat, round metal lids with a gum binder that seals them against the top of the jar. They may only be used once.
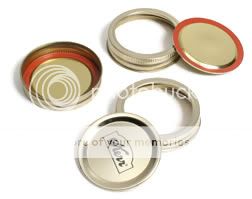 ] ]
Rings - metal bands that secure the lids to the jars. They may be reused many times. just be sure and check them for rust. they can get rusty after so many uses.
Optional stuff:
Foley Food Mill - not necessary; useful if you want to remove seeds (from blackberries) or make applesauce. 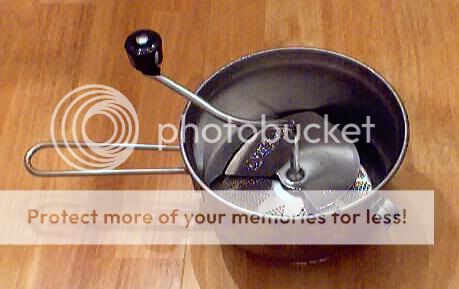 ] ]
It works well for blackberries, not so well for raspberries, and no one tries to remove strawberry seeds (they're so small). I suppose you could train monkeys to pick them out, but they'd probably form a trade labor union. But I digress...
Lid lifter (has a magnet to pick the lids out of the boiling water where you sterilize them. i just use a pair of salad tongs they seem to do the trick.
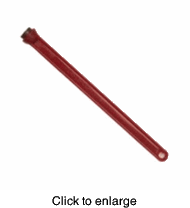 ] lid lifter ] lid lifter  ] salad tongs ] salad tongs
Lets get started
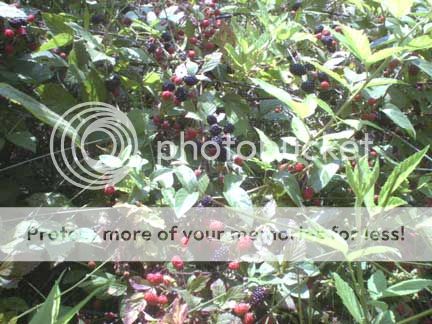
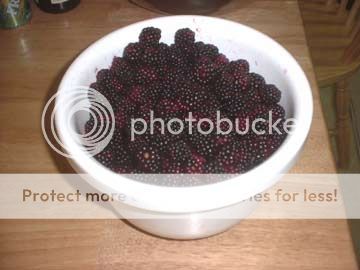
Step 1 - Pick the berries!
(or buy them already picked) It's fun to go pick your own and you can obviously get better quality ones! (As mentioned in the Ingredients section; you may use frozen berries (those without syrup or added sugar); which is especially useful if you want to make some jam in December to give away at Christmas!)
 ] ]
How much
Jam can ONLY be made in rather small batches - about 6 cups at a time - like the directions on the pectin say, DO NOT increase the recipes or the jam won't "set" (jell, thicken). It takes about 8 cups of raw, unprepared berries per batch.
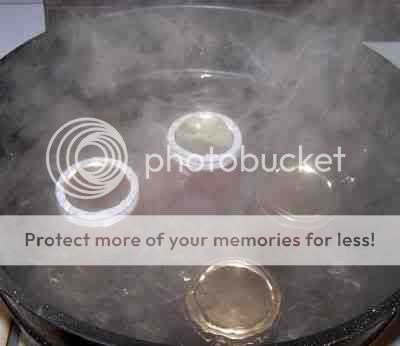
Step 2 - Wash the jars and lids
Now's a good time to get the jars ready, so you won't be rushed later. The dishwasher is fine for the jars; especially if it has a "sterilize" cycle, the water bath processing will sterilize them as well as the contents! If you don't have a dishwasher with a sterilize cycle, you can wash the containers in hot, soapy water and rinse, then sterilize the jars by boiling them 10 minutes, and keep the jars in hot water until they are used. This is what I do. I use my canner that way when it comes time to process the jam i already have the water ready. Because it takes a long time for that much water to come to a boil.  ] ]
NOTE: If unsterilized jars are used, the product should be processed for 5 more minutes. However, since this additional processing can result in a poor set (runny jam), it’s better to sterilize the jars. Put the lids into a pan of hot, but not quite boiling water (that's what the manufacturer's recommend) for 5 minutes, and use the magnetic "lid lifter wand" to pull them out (or salad tongs). Leave the jars in the dishwasher on "heated dry" until you are ready to use them (or in the hot water). Keeping them hot will prevent the jars from breaking when you fill them with the hot jam.
Step 3 -Wash and hull the fruit!
Wash the fruit in plain cold water.
 ] ]
With strawberries you must remove the hulls. With other berries, just pick off any stems and leaves.
Step 4 - Crush the fruit
just mush them up a bit - not completely crushed, but mostly. Do NOT puree the berries!!! Most people seem to like large chunks of fruit but crushing them releases the natural pectin so it can thicken. You'll need about 6 cups, mushed up. I use a small food chopper or a mashed potato masher, this gets the kids to help. just remember to leave it chunky. 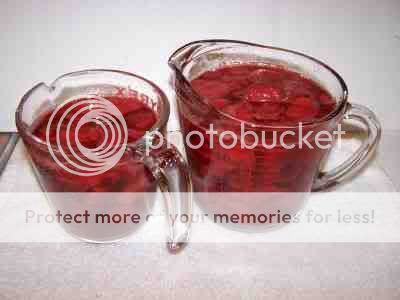
Step 5 - Measure out the sugar
Depending upon which type of jam you're making (strawberry, blackberry, raspberry, apricot, peach, grape, etc.) you will need to use a different amount of sugar, jam and pectin. 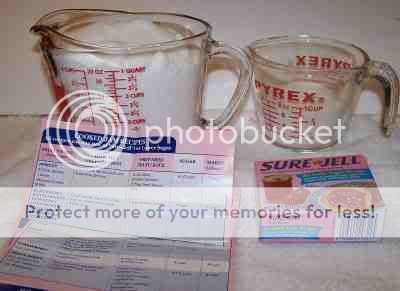 ] The precise measurements are found in each and every box of pectin sold. For most fruit; like berries, with regular pectin, about 7 cups of sugar. Mix the dry pectin with about 1/4 cup of sugar and keep this separate from the rest of the sugar. This helps to keep the pectin from clumping up and allows it to mix better! ] The precise measurements are found in each and every box of pectin sold. For most fruit; like berries, with regular pectin, about 7 cups of sugar. Mix the dry pectin with about 1/4 cup of sugar and keep this separate from the rest of the sugar. This helps to keep the pectin from clumping up and allows it to mix better!
Step 6 - Mix the berries with the pectin in large pot and cook to a full boil
Stir the pectin into the berries and put the mix in a big pot on the stove over medium to high heat (stir often enough to prevent burning). It should take about 5 to 10 minutes to get it to a full boil (the kind that can not be stirred away). Notes about pectin: I usually add about 20% more pectin (just open another pack and add a little) or else the jam is runnier than I like. With a little practice, you'll find out exactly how much pectin to get the thickness you like. Another tip: use the lower sugar or no-sugar pectin. You can add sugar to either and it cuts the amount of sugar you need from 7 cups per batch to 4 cups or less! And it tastes even better! On the other hand; I have never had success with the No-sugar pectin without adding ANY sugar. It always turned out runny and bland. 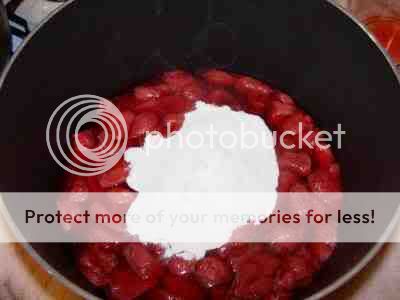
Step 7 - Get the lids warming in hot (but not boiling) water
Lids: put the lids into a pan of hot water for at least several minutes; 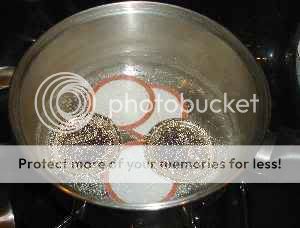 ] to soften up the gummed surface and clean the lids. And place a metal spoon in a glass of ice water (this will be used later). ] to soften up the gummed surface and clean the lids. And place a metal spoon in a glass of ice water (this will be used later).
Step 8 - Add the remaining sugar and bring to a boil again for 1 minute
When the berry-pectin mix has reached a full boil, add the rest of the sugar and then bring it back to a boil and boil hard for 1 minute... If you bring it back to a full boil fairly slowly (on medium heat rather than high) that will help reduce foaming. Remove from the heat. 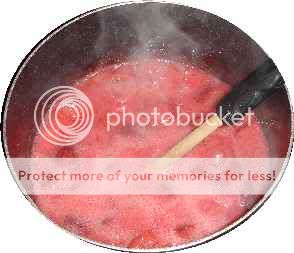
Step 9 - Skim any excessive foam
i personally skip this step and have had no complaints but for those who want perfection you can skim. What is it? Just jam with a lot of air from the boiling.But it tastes like, well, foam, so most people remove it. It is harmless, though. 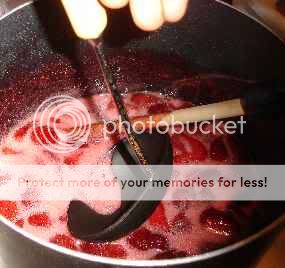
Step 10 - Testing for "jell" (thickness)
Using the spoon in the ice water, take a half spoonful of the mix and let it cool to room temperature on the spoon. If it thickens up to the consistency I like, then I know the jam is ready. 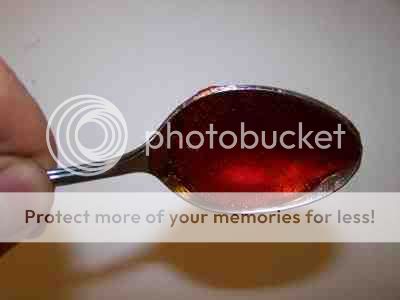 ] If not, I mix in a little more pectin (about 1/4 of another package) and bring it to a boil again for 1 minute. Now would also be a good time to do a taste test. If you find it isn't sweet enough you can add a little more sugar then bring it to a boil again for 1 minute. If you find it is too sweet there isn't much you can do just make a note of it and use less sugar next time. ] If not, I mix in a little more pectin (about 1/4 of another package) and bring it to a boil again for 1 minute. Now would also be a good time to do a taste test. If you find it isn't sweet enough you can add a little more sugar then bring it to a boil again for 1 minute. If you find it is too sweet there isn't much you can do just make a note of it and use less sugar next time.
Notes about "set" (thickening or jell): It takes 3 ingredients for jams and jellies to set: pectin, sugar and acidity. The amount of pectin that is naturally occurring in the fruit varies from one type of fruit to another and by ripeness (counter intuitively, unripe contains more pectin). It takes the right balance, and sufficient amounts of each of pectin, sugar and acidity to result in a firm jam or jelly. Lastly, it takes a brief period (1 minute) of a hard boil, to provide enough heat to bring the three together. Generally speaking, if your jam doesn't firm up, you were short in pectin, sugar or acidity or didn't get a hard boil. That's ok - you can "remake' the jam. I'll explain that later. If it has set the way you like now is a good time to take the jars out of the canner and start boiling the water once again.
Step 11 - Optional: Let stand for 5 minutes and stir completely.
Why? Otherwise, the fruit will often float to the top of the jar. This isn't a particular problem; you can always stir the jars later when you open them; but some people get fussy about everything being "just so", so I've included this step! Skipping this step won't affect the quality of the jam at all. I usually don't bother. You’ll also notice that the less sugar you use, the more the fruit will float (chemists will tell you it is due to the decreased density of the solution!)
Step 12 - Fill the jars and put the lid and rings on
Fill them to within ¼-inch of the top, wipe any spilled jam off the top, seat the lid and tighten the ring around them. 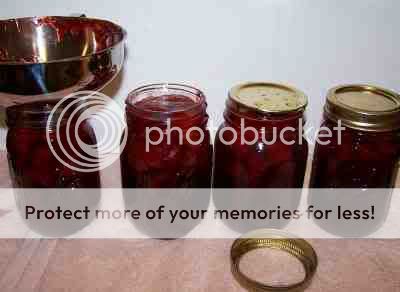 ] Then put them into the boiling water canner! This is where the jar tongs come in really handy! ] Then put them into the boiling water canner! This is where the jar tongs come in really handy!
Step 13 - Process the jars in the boiling water bath
Keep the jars covered with at least 2 inches of water. Keep the water boiling. In general, boil them for 5 minutes, which is what SureJell (the makers of the pectin) recommend. I say "in general" because you have to process (boil) them longer at higher altitudes than sea level, or if you use larger jars, or if you did not sterilize the jars and lids right before using them. The directions inside every box of pectin will tell you exactly. The directions on the pectin tend to be pretty conservative. Clemson University says you only need to process them for 5 minutes. I usually hedge my bets and start pulling them out after 7 minutes, and the last jars were probably in for 10. I rarely have a jar spoil, so it must work. But you don't want to process them too long, or the jam will turn dark and get runny. Note 1: If you plan to eat the jam immediately, or don't have canning equipment, you can let it cool, then store it in the fridge or freezer! It will keep for a month or two in the fridge and almost indefinitely in the freezer Note 2: Some people don't even boil the jars; they just ladle it hot into hot jars, put the lids and rings on and invert them (place them upside down). No authority I know recommends this, and putting the jars in the boiling water bath REALLY helps to reduce spoilage! To me, it makes little sense to put all the working into making the jam and then not to process the jars to be sure they don't spoil!
Step 14 - Remove and cool the jars - Done!
Lift the jars out of the water with your jar lifter tongs and let them cool without touching or bumping them in a draft-free place (usually takes overnight) You can then remove the rings if you like. Once the jars are cool, you can check that they are sealed verifying that the lid has been sucked down. Just press in the center, gently, with your finger. If it pops up and down (often making a popping sound), it is not sealed. If you put the jar in the refrigerator right away, you can still use it. Some people replace the lid and reprocess the jar, then that's a bit iffy. If you heat the contents back up, re-jar them (with a new lid) and the full time in the canner, it's usually ok. Once cooled, they're ready to store. I find they last up to 12 months. But after about 6 to 8 months, they get darker in color and start to get runny. They still are safe to eat, but the flavor and texture aren't as good. So eat them in the first 6 months after you prepare them! Another trick is to keep the uncooked berries or other fruit in the freezer and make and can the jam as needed, so it's always fresh. 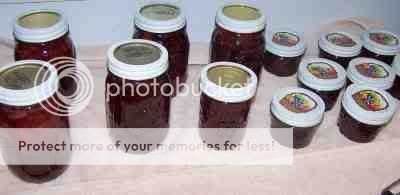
How to fix the jam if it didnt set right
Too runny - its really simple add a little more pectin and bring back to a hard boil for 1 min. about a teaspoon or 2 usually does the trick. but keep in mind you should only do this once because the longer the jam is cooked the more flavor it loses.
Too thick - just heat 1 or 2 cups of grape juice (or any other fruit juice of similar or neutral taste, like apple or white grape) to boiling. Then, gradually pour and stir it in until you reach the desired consistency, then continue canning!
|
|
|
|
|
|
|
|
|
|
|
|
|
|
|
|
|
|
Posted: Tue Jul 14, 2009 9:14 am
lee formerly porth From the Kitchen of: lee formerly porth HI everyone! I have been making homemade jams for about 4 years now and everyone i know loves them. Canning and making jams is a dying art so i thought i would share this dying art with all who would like to give it a shot. i know that this seems like a lot of work and well i wont lie it is. but you can make it fun and if you have kids that are willing to help that makes it even more fun. and the end product is well worth it. you have delecious all natural jam. its much healthier than anything you can by in a store and much more fresh. OMG OMG OMG!!! THANK YOU!!! i've been wanting to try this for some time now.
|
|
|
|
|
|
|
|
|
|
|
|
|
|
|
|
|
|