The Territories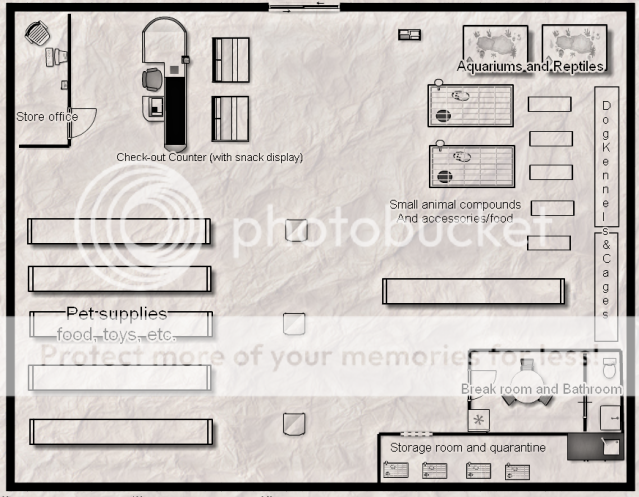
This is the floor plan of Rocco's Pet Emporium. The store has been devastated by a flood that tore through it after the Great Ones disappeared, so the merchandise is scattered and in disarray. For the most part, however, things are where they're supposed to be.
You don't dare venture outside. The world outside smells of death and predators. Besides, everything that you need exists inside these walls. There are several territories you may claim as your own:
The Small Animal Area -- This is where you began your journey, and some rats have chosen not to leave. This territory consists of the tanks and cages you had once lived in, as well as several rows of shelves carrying small animal food, hay, toys, and treats. This is the most abundant source of food in the shop. You may share this area with other small animals, such as hamsters or guinea pigs.
Aquariums and Reptiles -- Next door to the small animal cages, this is an area not widely explored by any but the boldest rats. The aquariums have flooded, leaving puddles all along the floor, and most of the aquariums are stagnant and smell of dead fish and algae. One large aquarium has maintained running water, however, and this is the most accessible source of fresh water in the store. If you're feeling bold, you can try fishing in the aquarium. You must be careful, however, as there are snakes and other carnivorous reptiles living in the area, and they will not hesitate to kill rats.
Dog Kennels/Cages -- Lining the side wall, the dog kennels and cages provide the most secure territory in the store. The kennels, bird cages and other large enclosures are wire, allowing you to climb or to squirm inside as protection from the outside world. This is the area where Bitey's colony lives, and also houses one of the side entrances to the underground tunnels where the wild rats live.
Break room/Bathroom: -- The best source of fresh water in the shop, but one of the most dangerous to travel to as there is a wide expanse of open territory before you reach the door. Once you enter the break room, however, you can enjoy a relatively posh life. The room has a few excellent food sources if you can get hold of them: a well-stocked vending machine as well as a refrigerator and cabinets with human food. The toilet has fresh water, and there are two sinks that both drip fresh water.
Quarantine Room: -- Lined with cages, this is where the rats and other animals are bred and kept until they're ready to be sold. This is also where sick animals were kept. There is a large basin here that occasionally has fresh water, and a drain in the floor that leads to the tunnels underneath the shop.
Pet supplies: -- On the opposite side of the store from the small animal enclosure and a dangerous journey, these endless rows of shelves include dog and cat food, toys, and other items usually sold in a pet store. There's no source of water here, though, making this one of the least attractive territories to settle in; there's plenty of reasons to make the journey across the store to raid the wares, however.
The Check-out Counter: -- There's a small hole in the floor here that leads to the tunnel system below the store. There's a well-covered, secure area to stay here, and a refrigerator as well as several shelves of human food. The refrigerator includes some bottled water that you might be able to chew open to drink, if you can figure out how. This is the smallest territory.
The Office: -- Tucked away behind the check-out counter, the office is accessible only through one door. The area is secure, but there's not very may resources here; no food or water is available inside this territory. It is however full of papers which make excellent bedding, and it's very defensible.
The Tunnels: -- Underneath the pet store, generations of wild rats have formed a complex system of tunnels in the foundation of the store. There are several openings into the above-ground areas of the store, allowing wild rats to steal supplies as necessary.