|
|
|
|
|
|
|
|
|
 Posted: Fri Feb 01, 2008 6:40 pm Posted: Fri Feb 01, 2008 6:40 pm
Here Is Some Stuff
GunZ Armor Statistics
Chest Armor Armor HP Weight HpArmr/Wght* Change Level Bounty
Ares Running Shirt 5 0 5 1.00 0 50
Renaut's Aqua Shirt 10 0 10 1.00 1.00 0 500
Ares Military Jacket 8 2 12 1.00 1.00 0 200
Renaut Cotton Shirt 10 0 10 1.00 1.00 0 200
Venico Leather Jacket 20 0 15 1.33 2.00 10 800
Vinz Winter Jacket 25 0 18 1.39 1.67 20 1600
Vinz Long Coat 22 0 16 1.38 1.50 20 1600
Miz Leather Coat 28 0 20 1.40 1.50 30 3200
Gloves Armor HP Weight HpArmr/Wght Change Level Bounty
Renaut Aqua Gloves 4 0 4 1.00 0 250
Ares Combat Glove 5 0 5 1.00 1.00 0 50
Vinz Winter Gloves 10 0 5 2.00 5 Armor 10 500
Miz Sheep Leather Gloves 12 0 6 2.00 2.00 20 1500
Ares Iron Gloves 15 0 8 1.88 1.50 20 1000
Trousers Armor HP Weight HpArmr/Wght Change Level Bounty
Vinz Training Trousers 10 0 10 1.00 0 50
Ares Military Trousers 8 1 10 1.00 None 0 200
Renaut Aqua Pants 12 0 10 1.20 2 Armor 0 500
Renaut's Active Trousers 15 0 10 1.50 3 Armor 0 200
Venico Ankle Band Trousers 22 0 15 1.47 1.40 10 1200
Webs Blue Jeans 23 0 14 1.64 1 A -1 W 20 3000
Miz Leather Trousers 25 0 15 1.67 2.00 20 2400
Shoes Armor HP Weight HpArmr/Wght Change Level Bounty
Renaut Aqua Sandals 4 0 4 1.00 0 250
Ares Combat Shoes 5 0 5 1.00 1.00 0 50
Venico Casual Shoes 10 0 5 2.00 5 Armor 0 100
Renaut Climbing Shoes 15 0 5 3.00 5 Armor 10 500
Vinz Casual Shoes 18 0 6 3.00 3.00 20 1500
Ares Iron Shoes 20 0 8 2.50 1.00 20 1000
Rings Armor HP Weight HpArmr/Wght Change Level Bounty
Ring for the citizens 5 2 5.00 0 400
Crying Hawk Ring 5 2 2.50 0 400
Warrior's Cry 8 2 8.00 10 1000
Pierre's Ring 8 2 4.00 10 1000
FMT Ring 5 5 2 7.50 20 10000
Ring of Good Fortune Max +2 20 10000
Altema's Ring 10 2 5.00 30 20000
Band of the Blood** 10 4 5.00 2.00 30 20000
Ring of a Feather Max +3 40 40000
|
 |
|
|
|
|
|
|
|
|
|
|
|
|
|
Posted: Fri Feb 01, 2008 6:42 pm
GunZ Aiming Guide
Know Your Range
No, I'm not talking about distance. The range in which your weapon fires. Go buy the level 0 pistol. Use the first crosshair (Type 1). Yeah, I know, it's huge and bulky and what not. Just use it for now. Now, fire and hold the mouse button. Notice how the zone is increased in size? That's the range in which the bullets will now hit. In other words, the faster you fire, the less accurate you will be.
So how do we fix this problem? Simple. Fire, wait a second, and it'll go down. If you ever play with me (Tsuteto), you'll always notice that my Revolvers don't fire fast. Why? Because then I'm inaccurate. I typically fire, wait for just under a second, but not less than half a second, and then fire again. That ensures my accuracy to hit you. However, this doesn't solve everything.
The Ping
Everyone's got it. Some are low, some are high. Basically put though, depending on how much they have, depends on how much you'll need to lead the person. The best way to practice this is to go into a game that is somewhere in the low levels of people (one's who just begun), and fire at the ones that roll around. My estimate is that for every 50 ping, you'll need to fire about one head equivalent to that of your opponent's body. So, if they have 100 ping, fire two heads forward. 150 ping, fire three heads forward. For 200 ping, I'd recommend more of about five heads forward. If you're playing with someone who has 250 ping and up, then you're a moron... or the-people-who-voted-'No'-because-they-were-on-their-team is.
What else?
That's about it. Probably the only other tip I can give you is that with every gun you buy, go back and find the range in which the weapon shoots. Also, the second crosshair (Type 2) can also be good, because when you target someone, it'll go from red to white, which is a lot easier to recognize than the red name, in my opinion. Start out with rifles, and then go onto using pistols. Rocket Launchers, Shotguns, SMGs, and Machine Guns are pointless for this exercise, seeing as they are either too inaccurate, or they have an area damage effect.
|
|
|
|
|
|
|
|
|
|
|
|
|
|
|
|
|
|
Posted: Fri Feb 01, 2008 6:44 pm
GunZ Dagger Techniques Guide
Standard techniques:
These are the ones you ALWAYS hear being associated with daggers. The standard, easiest to do techniques.
1) Stab-A common, fast stab. You just left click. Don't just walk around spamming this. You'll get blocked hardcore with bad timing. The speed of it rarely shows the stabbing animation to enemies, so you'll get called hacker by the n00bish of people, just for using the basic attack. This makes it hard for gun toting enemies to attack, especially if you hit forward, because you will be behind the gun, it'll be firing perfectly past you.
2) Push-This is the move that makes people hate daggers and call them n00bish. Alone, it's rather useless. You simply tap the right mouse button and go flying into your enemy. If they fail to safefall, it's the ground for em. If not, you might, depending on your timing and placement, suffer a shot or two. The best use for this is a feint and a guard breaker. Against a butterflier, if your timing is perfect(mine only has been twice), you can gatling gun this. I'll get into that later. Don't be afraid to use this, but by no means, NEVER over use this.
3) Circling-This is number one with side to side movement thrown in, this is what you do against those trying to run away. You just circle, turning your mouse in a tight arc.
4) Cornering-This is number one, but forcing your enemy into a corner, preventing any escape. A very gratifying opportunity for any daggger user, seek out corners, and love them.
Above standard techniques:
These are the ones that require some effort.
1) JSD-This is a move that uses the quick spin-out of the dagger quite effectively. Like with the Slash Shot, you almost have to relearn aiming. The most effective use I've found for it is repeating it before an enemy using revolvers. I'm unsure of the steps in full, so to avoid coming off as being a know-it-all, I'll give you the gist of it. While in the air with your gun, you shoot. You hit a key or use the mouse wheel (I prefer this), switch to your dagger. You dash with the switch as you can do this right after the spin-out. You land, switch back to your gun and repeat. Essentially, it's a wide moving attack that goes back and forth. You end with dagger on both sides. Often associated with KickAssJack. Flow this into Fade Shooting, YoYo Hopping, and Dagger Hopping.
2) Fade Shooting-Not to be confused with Chunky Gerbil's Fade Shot which is prety much half stepping into a wall, done with a sword. It involves tumble, which many KStylers will instantly poo-poo. It's harder to hit than most people assume, rockets are its major weakness. Very majorly a distance move. I've only seen this used by me and Selryam, who I taught it to. You shoot, tumble, hold mouse button, if timed right, you'll shoot the most you can, with a shotgun this is twice. At the end of the roll, you can do two things after switching to your dagger and finishing the spin-out animation: Jump and go any direction with a dash, or dash along the ground the opposite way. Mixing it up is the best strategy. If your timing is good, you an switch your gun mid-dash and do this in rapid succession. Just don't tap any directions if you switch to keep the speed. Flow this into YoYo Hopping, Reverse Stabbing, Tenth Hopping, JSD and Dagger Hopping. Repeating this is good if your enemy insists to stay at a distance. Best against automatic weapons.
3) YoYo Hopping-Not necessarily dagger exclusive, but far easier with a dagger from my experience. This can be done in any direction, and is essentially alternating between dashing silently with a dagger and dashing with your gun. Both a movement and attack technique, this is a wonderful flow-in technique. It throws off your enemy's train of thought, and helps you get behind for an instafall or just a good shot. If you don't use it as a fade in, you have to jump first going in a direction. At the peak of the jump, maybe a bit before, dash the other way. You will hit the ground, instantly jump back up, with your dagger still in your hand. Switch to your gun of choice. Shoot for as long as you are in the air still going in the same direction if you like. At the peak of your jump, double tap the other way. With proper timing, you will float back the other direction with dashing speed. Hitting the ground again, continue switching to any weapon. With great timing, you can do this from gun to gun, in any direction, possibly twice in one hop. Easiet to go dagger to gun in succession. A great get around technique. Can be used at any range. If you rail the timing with the gun and tumble, no worries, just go into Fade Shooting. If you do it right, you can flow it into Fade Shooting, Tenth Hopping, Dagger Hopping, JSD, Reverse Stab, and you can also Space Invade with it.
4) Dagger Hopping-Both an offensive and a movement technique. You group jumps, dashes, and stabs into any order really. The best order is dash, jump, stab, dash, repeat. If you feel gutsy, go dash, stab, jump, dash, repeat. This order is alot like Reverse Stab. It's a great move to use to get around places and to attack solitary targets. You can easily flow this into any dagger move, easiest is Reverse Stab.
5) Reverse Stabbing-A voidstep-esque move that can easily confuse people. You dash, and stab to cancel, then dash another direction. Great when cornering people or just dodging. It's my primary tool for dodging revolvers and automatics. Also great for getting behind butterfliers. Doing that is alwasy risky though. Your Reverse Stab is sweet because it's a half length dash and can flow into any move very well. Particularly Dagger Hopping and Tenth Hopping.
6) Space Invading-Moving like an enemy from space invaders. Mix YoYo Hopping and Reverse Stabbing. You dash forward, dash to a side, forward, another side. Great for dodging rockets and automatic fire.
7) Dagger Training-Basically a ground based Dagger Hop. Dash, then stab and repeat. The name comes from the fact that you look like a train while doing it. Thanks to Revolver Oclelot for reminding me!
cool Dash Hop-A slightly quicker dash. You jump, dash, switch to gun, back to dagger, and dash. You can go with less interruptions this way, it feels slightly faster than the normal dash.
9) Wall Raiding-Run onto the wall. Reach a desired height, and stab. Right after the stab, hit jump again. You'll stick to the wall and keep running. You can do this at any time, as much as you want. If you time it right, you can, while on a wall, hit a person near a wall up to 9 times(my maximum). Flow this into Reverse Stab, Dagger Hop, YoYo Hop, Dagger Flash and more Wall Raiding. An effective use of it is to hit once, jump off the wall, dash behind the enemy, repeat. The closer you can stay, the better.
10) Dagger Flash-You jump, you dash. Natural dagger instinct right? Natural instinct with any melee weapon really. Then there's flashing, you stab midair, suddenly your dash stops. Dagger Flashing is dashing any number of directions in one jump. Typically it's two dashes. Jump->Dash->Stab->Dash->Stab. The second stab is just to keep you from staying stuck in a dash too long. A great Space Invading technique, as it can really speed up movement. Flow this into Dagger Hopping, Tenth Hopping, YoYo Hopping, and more Dagger Flashing.
11) Dagger Machine-The equivalent of the Butterfly for daggers, a fast hopping attack that blows things away, particularly gunners. It's more or less Circling +5. Using this against swordsmen is risky, but if you can Reverse Stab well, it should be no problem. Maximum mouse sensitivity helps a lot. You stab, jump, dash stab, stab, repeat. You HAVE to be dashing around in a circle, turning your mouse in a very tight arc. Both hands need to be moving fast for this to work. If somebody has their gun out, they'll have trouble taking something else out, this move can force people into the hit animation twice in one stab(you'll hear the melee impact sound effect twice) because the dagger hits once passing in, and again passing out. Flow this into Dagger Hop, Reverse Stab, and YoYo Hopping.
12) Flip Stab Shot-The equivalent of the SlashShot for daggers, making the gun move like a melee weapon. However, there's a difference. You NEED the flipping off of a wall animation for it to work. It's hard to time correctly. You hit the wall, preferably from the side, with your dagger. You flip off of it, right after the flip starts, stab and switch in one movement, holding the mouse button down. You'll shoot while your gun goes forward during the flip, switch back to your dagger, dash away. Handy move. Flow it into Dagger Flash, or if low, Dagger Hop and YoYo Hop.
Advanced Dagger Techniques:
These ones are harder to time and often riskier to do. When you do them well, it's amazing what they do.
1) Tenth Hopping-You will fail at this alot. I do still, it's hard to time. Essentially, it mixes YoYo Hopping, Dagger Hopping, JSD and Reverse Stabbing. You go in a very small area in any combination of directions, floating to and from location, kicking up lots of dust. You dash, stab, jump, switch to gun, shoot, switch, dash another way, stab, dash another way, jump, repeat. I doubt I got the steps right, but when done side to side, you stab on one side, shoot in a very close center, stab on a very close other side. You're both up and down in each location once before moving on. Not something to rely on. If you do, it's a good technique to use right after a series of Dagger Hops and YoYo Hops. Great in maps like prison. If you fail, flow it into Fade Shooting most likely. If not, flow it into Reverse Stabbing.
2) Instafall-This is a hard move to time as it uses the animation of you AND your target in it. You start out with a normal stab, the enemy will ideally get hit. The hit animation will take place about 1/4 the way through your stabbing animation. Once the hit animation is half way through and your stab is 3/4 the way through, right click. You bypass the wind up for the push. If timed right, your enemy will get hit by the lunge RIGHT before the animation finishes. The flying back animation will be GONE, and they'll fall instantly. I've aggravated people terribly with this move and Dagger Gatling at dungeon before. Again, hard to time due to the fact that you have to use the end of the enemy's animation as well, a very situational technique.
3) Dagger Gatling-Pushing in great incredible succession. You WILL take damage while doing this, it's required. The plus side is you use the unblock able lunge as fast as the normal stab and don't move. You have to be facing a sword, typically a butterfly. Stab normally as their animation begins, as soon as the sword gets close, right click. You will stop. Your attack will continue on and move forward. If this doesn't knock them over, keep repeating. It often gains the Instafall effects.
General Tips:
1) Feint, alot. By this I mean fake your enemy out. Alot of people who play GunZ don't expect this for some reason. In a gladiator match for example, start charging your Massive Strike. When your enemy gets close, lunge into them. The charge stops instantly and you fly into em. Surprisingly effective.
2) Walls are very useful, this always applies. Daggers have the fastest natural wall strike, make use of it, wall bounce on your back and sides too.
3) For those times when you go up against turtles adn butterflies, Dagger Hop and Reverse Stab. Here's a tip, stab in the second half of your jump and dash. If you go in close, time it so that you hit with the second half of the stab. You're alot less likely to give the opponent a massive strike, and get thrown off balance.
4) If they DO get a massive strike and you aren't thrown off balance, STAY CLOSE TO THEM IN THE FRONT. Alot of times it'll go right around you. To help this, turn a quick 45 degree angle with a weapon switch. It's not consistent, but can be a life saver. If they reverse massive you, keep spinning. Again, not constant, but can be a life saver.
5) Remember the basic techniques, and use them creatively. For example, somebody is chasing you, or behind you and there's a wall in front of you, run up it, and hold backwards as you Flip Stab Shot, or Dagger Flash behind them. This does kill alot.
6) If somebody insults daggers in game, try to get them to fight you 1v1. You may not win, but if you focus, you will get a good practice opportunity. You'll learn more about any style you fight every time you fight it, this is universal. However, if they don't agree, a psychological warfare comes into play. Go for them first, make 'em mad, make 'em steam. The more angry a player is, the less they can focus, the easier they are to kill.
|
|
|
|
|
|
|
|
|
|
|
|
|
|
|
Posted: Fri Feb 01, 2008 6:45 pm
GunZ Deathmatch Tips
Sandwich Other People Whenever Possible
If you see two people fighting, try getting on the outside and let the bullets fly. If you're lucky, sometimes you can get three or more in a single area and shoot them in a line. Not only will this royally piss them off, but also it's going to land you a lot of quick, low risk kills. Don't feel bad; they'd do it to you if they had the chance.
Wasting Ammo Will Get You Killed
Ever run out of ammo and wondered, "Wtf do I do now?" There are pickups that you can get to increase your ammunition, but the odds are strong that running out of ammo is going to seriously reduce your capability to kill people and will more than likely get you killed since you can't really defend yourself. If the enemy isn�t in your crosshair, lay off the trigger until they're back in it. It�s hard to do sometimes, but it's best to keep it in mind.
Keep Moving
4/5 Dentists Running in a straight line means you're an easy target. Rolling, dashing, and jumping will make you a much more difficult target. If you have an accurate ranged weapon, rolling away from your target would be the best option. If you have inaccurate mid-range damage, rolling to your target would be the better option.
Utilize Obstacles
If someone is focusing on you, use obstacles to waste his ammo and strike back. If two people are attacking you, use the map to only let one see you at a time.
Follow Your Target
If someone is following the previous two tips, don't let them lose you. Switching targets once you've caused damage to someone means you just handed someone else a free kill. This also means you now have a stronger target to deal with.
Read Your Opponents
An enemy running away means a weak enemy. Usually, if you see someone trying to distance themselves into a defensive position, you'll want to follow them and pull the ol' trigger.
Grenades are Your Friends
A properly placed grenade in a group of unaware brawlers means loads of kills for you. Likewise, avoid finding yourself in an unaware group that gets grenaded.
Sword Fighting
Generally in a deathmatch, if you pull out your sword, someone will be carrying their gun, and that guy is going to drop you with all quickness. If you find yourself in a situation where you can get the person one on one and are pretty decent with the sword, that might be the time to bust it out and do some chopping. Right-clicking will knock down your enemy, leaving him vulnerable to attack from your ranged weapons. Holding down the sword attack button will charge your weapon with a stun attack. Releasing the attack will cause stun damage over an area of effect. Note: blocking and quick movements are going to be necessary even if they also pull out a sword.
Counters to Sword Fighting
Blocking is only effective against shots to the face and chest. If someone is blocking with a sword, shoot them in the legs or toss a grenade. If those two aren't options for you, going sword vs. sword might be a good idea if you know what you're doing. Blocking will be key, as a successful block will instantly charge up your sword and deliver a decent amount of damage in a large area of effect. If someone tries to use a sword knockdown on you, hit your jump button to quickly reverse the effects before you hit the ground.
Weapon Combinations
Some maps are more favorable to certain weapon types. For large open maps or maps with long hallways, using accurate ranged attacks like rifles and pistols will give you an advantage. For smaller areas taht have lots of corners, shotguns or SMG's might be preferable. In either case, having a diverse array of weapons will usually play out in your favour. When your environment makes it appropriate to use a sword, one good tactic is to charge your sword, deliver the charged attack which will stun your enemy leaving him defenseless, and follow the stun attack with a ranged attack.
Utilize the Map's Health and Armor Kits
If you're low on health and are somewhere close to a health or armor kit, take the time to get it. They're worth it. If you don�t know what they are, they're the glowy items you can get that instantly raise your health or armor when your character runs by them. If you don't know where they are on the maps, find out. Making sure that your enemies don't get to them when they need it can mean the difference between you or them dying. usually, the hardest health kit to get is the most rewarding.
Reloading
Reload at every safe moment possible, even if you have some ammo in your clip. This will reduce the amount of reloading in firefights and it will maximize efficiency from ammo pickups.
Killing Laggers
Often times, you may fire off target only to strike the fatal blow. What?! It looks like it went strait through air. But no! It nailed him. The key to the game, while using semi-automatic weapons, is to predict your enemy's movements and shoot a step or two of where he currently is. Your hit indicator will not beep when you do this, but if you develop your skills, you will notice considerably faster skills.
|
|
|
|
|
|
|
|
|
|
|
|
|
|
|
|
|
|
Posted: Sat Feb 02, 2008 12:21 pm
GunZ Hitboxes Explained
Targeting
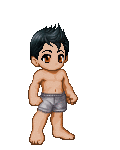
The mechanics for hit boxes in Gunz are not very complicated. There are only two hit boxes, each dealing different damage percentages to HP and AP. When there is no AP remaining, 100% of the wepaon's damge is taken away from HP.
On the diagram, area 1 on super cool Aqua Man represents the headshot range, which deals 75% of the weapon's damage to HP, and 25% to AP. Headshots are preferable for this reason, since lowering your enemy's HP is the primary goal.
Area 2 represents body shots, which deal 50% of the weapon's damage to HP and 50% to AP. Body shots are not as effective as headshots, but easier to accomplish.
Notes on Armor Concerning Targeting
Armor points add up for a total score. The location of the armor is not important. For instance, someone wearing 10 AP boots and nothing else has the same exact armor effect as someone who wears 10 AP chest armor, no matter where the person is shot.
In summary:
1. Hits to the very upper chest + head deliver 75% of the damage to HP and 25% of the damage to AP.
2. Hits to the lower chest and below deliver 50% of the damage to HP and 50% of the damage to AP.
3. If the damage equates out to an odd number, health takes the lower amount and the extra point is taken away from armor.
4. Armor Points are global. It doesnt matter which armor pieces you're wearing, only the total number of points. Not wearing armor over a peice of the body does not effect that part of the body more or less than any other. 5. If you run out of AP, 100% of the weapon's damage is taken away from your HP.
|
|
|
|
|
|
|
|
|
|
|
|
|
|
|
Posted: Sat Feb 02, 2008 12:23 pm
GunZ General Tactics
General:
There are tactics that can be used just about everywhere. Here's just some things:
Know Your Map:
Not knowing where you're going can be a lead to death. If you're running backwards, it'll be really bad if you don't know about the area to turn, or where you can lead people.
Running:
This is a tactic, yes. Running and reassessing your situation is the best thing to do in most cases. However, you do NOT run with your back to your opponent, unless you are sure you can get away, or wall-canceling a lot, etc etc etc. Still, my favorite quote today is from Jae-Yook, saying "You play weird. Like scared. Run away." That's why I tend to get about 20-30 kills at the least per dungeon or castle TDM I play.
Hiding/Camping:
Uh, DUH. Of course you're going to hide. If you always stay in the open, then you're screwed. If you're the last one alive, and there's about 3 people on the other team, then you'll want to hide and pick them off one by one. Patience is of the issue. Which leads us to the next topic...
Patience:
Not everything is in-game. You've got to also be able to have your patience if you're camping, or if you're trying to hit someone, but you can't seem to hit them. Losing your patience is a good way to get killed.
Change it up:
Oh hey, you snipe a lot. Guess what? They'll be looking for your areas then. You can't be just a sniper all the time, and if you are, you've got to change your positions a lot. If you snipe from a cliff in Island a lot, they're going to look for you there.
Be aware of your surroundings:
There's a grenade coming at your face. Move. There's an enemy moving a way. Cut them off. This ties in with the 'Know your map', but consequentially, if you're hiding, you've got to be able to hear enemies' footsteps and dashes, as well as reloads. If you're enemy goes to hiding, they might be reloading. If you hear a reload, then CHARGE. Don't give 'em a chance to med either.
Make Predictions:
Sometimes you don't know what your enemy is going to do. However, based on sounds and previous actions, you can guess pretty well as to what's going to happen. In that sense, backfire their plan. If they're coming around, turn around and hide, and shoot as they come to find you, only to ask 'What the...?'
Have something that relaxes you:
Some people need music to play. Some people need silence to play. This is all key to a well-played game. Find something that you can relax too while playing. If you're stressed while playing, you'll only get killed, and be led to more stress.
Maps
There are specific things for each map. I don't know every one of them, but I can give a number of general areas.
Dungeon:
There are several things to use in the dungeon. You can stun, you can knock, you can snipe, you can trap. Just about anything. Here's some things:
1) Crystals: These can be key in them. Mostly used at the stairs. If you're a sniper and you maneuver to these here, you'll cause your enemies a lot of grief.
2) Use the stairs: Mostly for if you can wall-cancel well. For example, at the health spawn point, you've got not just 1 or 2 areas you can pop up and shoot at the people standing there. You've got more like... 7 or 8. Who says you've got to keep right next to the health to shoot?
3) Lead them to traps: If you've got a partner, and they charge up a stun, charge out at someone, get shot by them, then charge back where you came. As you go by, you can have your partner stun them, and then you can waste your enemy.
4) Knock 'em: This is another stair thing. Think about it: You've got pits a plenty. If they're just standing there, knock them into hell. It's not only fun to do it, it's also fun them to whine and complain about your 'noobness'. Just reply by saying "If you got noobed, then who's the real noob?"
Castle:
My main key for this area is the big bridge. Then again, you've got to know how to wall-cancel like nothing else. You can pop up in a lot of areas and shoot at them, or you can stand on the bridge, if you can't wall-cancel, and snipe people. Also, the map is about 1/4 filled with low ceilings that people visit regularly. That's a perfect opportunity for a 'Situational Insta-kill'. You know, right click, do a 3 combo sword chain, then blast away with your gun.
After word:
Upon a change of the enemies' movement, I can react just as quickly. Shotguns aren't the most effective things to me, seeing as I enjoy my distance, and if I'm ever close, I will simply keep moving in random directions that I can't even tell what I've done. I also make a quick last minute change a lot of times in case something won't work when I see it. In that sense, I make a LOT of predictions. Where enemies will be, what is probably the best use for this person, etc etc etc.
|
|
|
|
|
|
|
|
|
|
|
|
|
|
|
|
|
|
Posted: Sat Feb 02, 2008 12:24 pm
GunZ Melee Guide
Introduction
Statistics
Bounty
I never found Bounty to be too much of a limiting factor in GunZ, but I thought I should touch on it. It isn't huge, but there is a difference in price between the different melee weapons. Kodachis are a tad more expensive than Swords, which are a tad more expensive than Daggers. Again, like I said, unless you're spending money frivolously, trying to buy all the best guns to try them out, or just bought a couple rings, bounty should not limit your decision.
Weight
Like Bounty, the weight of your offence shouldn't sway your decision too much when choosing weapons, but it's still something to think about. Unlike Bounty, the difference in weight is significant. Let's take for example the level 9 Dagger, level 10 Sword and level 10 Kodachis. We're looking at 6 Weight, 12 Weight and 18 Weight respectively. That being said, the average armor you can net per weight is about 2. So going from a Dagger to a Kodachi may mean a difference in 24 Armor. Yikes!
Sustained Damage (DPS)
Now we're getting to the fun stuff. Sustained Damage, or DPS (Damage per Second) is the damage that can be done over time to a single target. This would mean the damage done if the target were standing there and you just kept swinging. We'll just talk about the Sword and Kodachis because the Dagger is quite a ways behind these two in terms of damage. The Sword and Kodachis have very similar Sustained Damage and this was most likely done on purpose. For example, the level 43 Kodachis damage sits right between the level 40 and level 50 Swords DPS. I'd say if you were looking for swing damage, dagger shouldn't be on your list and you should consider a Sword or Kodachi.
Spike Damage
An often over-looked type of damage. It's defined as the ability to do big number damage, or alot of damage over a short period of time. Often, in Gladiator matches or in more Korean-style oriented Deathmatches, you'll be lucky enough to sneak a melee hit in every now and then. What you're looking for, is for that hit to do the most damage it can, and that's where Swords shine. They have the best damage per hit which can explain why many people opt for this weapon when do Gladiator or Korean-style so when one Sword swing does manage to get through someone's block, it hurts. As well, that would also explain why many of these types of players use Shotguns (for their high Spike Damage).
Knockdowns
Introduction.
A topic so important, it deserved its own section. The Sword and Kodachi have similar, if not identical, knockdowns. The opponent is uppercutted in the air and then drops to the floor a couple feet infront of user on their back. The Sword does an uppercut animation, while the Kodachis have a spin-and-slice animation. The Dagger-user lunges forward and attempts a stab. If successful, the opponent collapses and is knocked back a few feet, then falls on his back.
Getting to the Opponent
This is where the Dagger shines. Upon right-clicking when using a dagger, your character will lunge forward to stab your opponent. This makes it alot easier to get close and to nail your knockdown. With the Sword and Kodachis, you have to be right upto your opponent and he has to be within melee range for your knockdown to hit. While swinging, you also remain still on the ground. This can make it almost impossible to execute a knockdown without the Dagger if the ennemy is running away.
Time to Recover
I may not be 100% correct, but when using the Dagger knockdown, it would seem the bracket in which you can hit Spacebar to recover (so you or the opponent isn't knocked down) is shorter when using the Dagger animation which means people are most likely to miss or not have enough time to hit their spacebar. The victims of Sword and Kodachi knockdowns can recover anytime while they ascend up in the air.
Post Right-Click Animation
So you missed your knockdown or they recovered? Unfortunately, for Dagger users, they're stuck inplace doing a stabbing animation for a second. This leaves them quite vulnerable to be attacked. Fortunately, for Sword and Kodachi users, after an uppercut swing, they are free to move as they please.
Knockback
All the melee weapons knockdowns have sort of way of knocking back the user. This comes in handy in maps such as Island or Dungeon where there are gaping pits to feed your ennemies. The Sword and Kodachi users remain the same position and knock your opponents up and backwards and even if they recover, they are unable to move in any direction to avoid the fall. Unfortunately for Dagger users, when you lunge, you may fallback with your opponent and end up in the same hole as them.
Blocking
An incredibly important part of the game is the ability to negate any bullets and slashes on the upper half of your body. One can only do this while Blocking with a Melee weapon. A tremendous disadvantage to those using daggers is they cannot block at all! This feature is reserved only to Sword and Kodachi users. How much Blocking is valued, varies from person to person, but speaking for myself, it's quite important.
Combos
Combos with melee weapons happen when you click multiple times on your left-mouse button and your character executes a sword swinging combo. For some of us who are a click happy, this means your character will go into combos when you don't want them to. Your opponent may have run away, but you're still standing there finishing off your combo swings because you were so eager to get a swing in that you clicked frantically. Dagger users need not fret because there are not combos for Dagger users, every swing was like the last.
Swinging While Running
Only Dagger users may swing their weapon while running through maps. This does help when pushing someone else into a corner and keeping them there. Sword and Kodachi users must stand still to swing.
Korean-Style Play
This is a rising trend in the world of GunZ. It involves flying through the air, weilding a sword, scaling walls and performing quick Shotgun shots. Unfortunately for Dagger users, performing some moves such as scaling walls felt alot more sluggish. Your toon tends to bounce off the wall rather than scale it. However, Kodachi users rejoice! The lower delay made a significant difference as it allowed you to get more swings in the air or against a wall which makes it quite a bit easier to perform some of the more elusive moves.
|
|
|
|
|
|
|
|
|
|
|
|
|
|
|
Posted: Sat Feb 02, 2008 1:00 pm
GunZ Armor Selection Guide Basics This guide will be based around the Armor/Weight ratio surrounding each piece of armor. Because really, what it comes down to, is Armor pieces should be used to fill in the weight you have left after equipping all your items. Offense such as guns and swords should not be sacrificed to get better armor. The more offense you have, the more you kill, the more you kill-steal, the more you level. Life vs Armor Life is calculated as being twice as effective as armor, because there are occasions where your armor will barely drop in the case of armor piercing shots and head shots. So one would rather have Life than Armor Armor Selection Getting Started After filling up your weapon slots and your equipment slots however you desire, you should worry about filling up those armor slots to get all the way up to 100 weight. You should keep in mind that some weapons weight goes up and down 2 weight as levels go on. Ratios and Changes When selecting your armor, high ratios and changes are your best friend. For example shoes and gloves offer the highest ratios, so you'll want the best possible pieces here and you should give priority to those pieces as opposed to getting the best armor. Also, you'll want to have a look at the Changes. If upgrading from one piece to another yields a poor change ratio (1.00 in the case of Iron Shoes) than that may not be the best choice for you because other pieces such as pants and even armor will give you a better ratio than the 1.00 from upgrading your shoes. Order of Purchase Assuming you're past level 20 and are planning what end-game items you're using, you'll want to buy: -Warrior's Cry rings; Amazing ratio, low level, cheap. -Vinz Casual Shoes; Next shoe change to low, this is a great pair. -Ares Iron Gloves; Decent Change and Ratio, still beats out any armor piece. Now depending on how much weight you have left, you have the following options: -Upgrade to two Band of the Bloods; This option is really incase you find yourself with alot of Bounty to spare, the change is good enough to make it worth neglecting an armor piece for. -Buy Miz Leather Trousers; Best pants ratio, great change, great armor. Now, to REALLY be used as a filler: -Buy the best armor piece you can with what weight you have left -Upgrade to Ares Iron Shoes if there isn't that much room to work with. -Equip extra grenades or other equipment. Armors really do have the poorest ratio and it should be the last thing you should consider upgrading. It should be used as a filler, as opposed to the main armor piece used to build around, which I see many people doing in public games. Rings Warrior's Cry's are great ratio rings, extremely cheap. They should be used until you really have Bounty to splurge and can afford the price and extra 4 weight the Band of the Blood's have to offer. The max weight rings are trash and no one should waste money on these. Rings slots are very valuable, and the last thing you want them to do is NOT give you life. What is the best armor for level XX? Well, you pull up the Armor listings page found here: http://www.gunzfactor.com/armor.php and have a look at the armors available at your level. If you're level 10, you should have Warrior's Cry rings. Let's take for example you're level 12. At level 12, you can buy the following level 10 regular armors: -Venico Leather Jacket (R:1.33) (C:2.00) -Vinz Winter Gloves (R:2.00) (C:+5 Armor) -Venico Ankle Band Trousers (R:1.47) (C:1.40) -Renaut Climbing Shoes (R:3.00) (C:+5 Armor You should spend money and upgrade your gloves and shoes before your jacket and pants because they have a substantial Change and Ratio compared to the other two pieces.
|
|
|
|
|
|
|
|
|
|
|
|
|
|
|
|
|
|
Posted: Sat Feb 02, 2008 1:17 pm
GunZ Weapon Statistics
Daggers Damage Delay DPS Level Bounty Weight
Rusty Dagger 8 366 21.86 0 20 5
Iron Dagger 9 356 25.28 5 200 5
Military Dagger 11 356 30.90 9 400 6
Light-weight Dagger 10 346 28.90 18 1000 5
High-end Dagger 12 351 34.19 27 2500 6
Phantom Slaying Dagger 13 356 36.52 36 5000 4
KEUK-CHO-HON 14 356 39.33 45 10000 6
Swords Damage Delay DPS Level Bounty Weight
Rusty Sword 15 359 41.78 0 20 10
Iron Sword 16 359 44.57 5 300 10
Military Sword 18 349 51.58 10 600 12
Light-weight Sword 15 339 44.25 20 1500 9
High-class Sword 20 339 59.00 30 3600 13
Devil Slayer 22 339 64.90 40 7200 11
YONG-WOL-RANG 24 329 72.95 50 15000 12
Dual Swords Damage Delay DPS Level Bounty Weight
Iron Kodachi 14 290 48.28 10 850 18
Light-weight Kodachi 15 280 53.57 21 2000 14
High-end Kodachi 16 280 57.14 32 5000 20
Red Blood 18 260 69.23 43 12000 18
Single Pistols Damage Delay DPS Level Bounty Weight Clip
Raptor 50 8 250 32.00 0 20 7 60/10
Raptor 80 8 200 40.00 5 200 7 72/12
Raven 5 10 250 40.00 6 300 8 60/10
Raptor 120 9 200 45.00 10 500 7 72/12
Raven 6 12 220 54.55 14 800 8 84/14
Raptor 160 11 180 61.11 24 2500 8 78/13
Raven 7 13 210 61.90 32 5000 9 90/15
Raptor 200 11 160 68.75 40 8000 8 84/14
Single Revolvers Damage Delay DPS Level Bounty Weight Clip
Minir 567 16 400 40.00 0 20 8 48/6
Dynax 7000 14 300 46.67 5 220 7 64/8
Minic 567 Limited 18 400 45.00 7 340 8 48/6
Zaurus A 20 400 50.00 10 550 7 48/6
Phantom Cruise 22 400 55.00 16 1200 9 48/6
Phantom Cruise N 23 400 57.50 21 2500 8 48/6
Dynax 8000 18 300 60.00 25 4000 7 64/8
Minic 567 MK.II 25 400 62.50 34 7000 8 48/6
Zaurus B 25 360 69.44 42 12000 8 48/6
Dual Pistols Damage Delay DPS Level Bounty Weight Clip
Raptor 50 x2 16 250 64.00 0 40 14 60/10
Raptor 80 x2 16 200 80.00 7 360 14 72/12
Raven 5 x2 20 250 80.00 8 540 16 60/10
Raptor 120 x2 18 200 90.00 12 900 14 72/12
Raven 6 x2 24 220 109.09 16 1440 16 84/14
Raptor 160 x2 22 180 122.22 26 4500 16 78/13
Raven 7 x2 26 210 123.81 34 9000 18 90/15
Raptor 200 x2 22 160 137.50 42 14400 16 84/14
Dual Revolvers Damage Delay DPS Level Bounty Weight Clip
Minir 567 x2 32 400 80.00 0 40 16 48/6
Dynax 7000 x2 28 300 93.33 7 396 14 64/8
Minic 567 Limited x2 36 400 90.00 9 612 16 48/6
Zaurus A x2 40 400 100.00 12 990 14 48/6
Phantom Cruise x2 44 400 110.00 18 2160 18 48/6
Phantom Cruise N x2 46 400 115.00 23 4500 16 48/6
Dynax 8000 x2 36 300 120.00 28 7200 14 64/8
Minic 567 MK.II x2 50 400 125.00 36 12600 16 48/6
Zaurus B x2 50 360 138.89 46 21600 16 48/6
Submachine Damage Delay DPS Level Bounty Weight Clip
Renard 7 90 77.78 0 30 15 160/32
Walcom S5 8 90 88.89 10 750 15 180/36
Ellan 5 90 55.56 10 700 12 300/60
Renard V 7 85 82.35 24 2800 15 160/32
Walcom S6 9 95 94.74 24 2800 16 180/36
New Renard V 8 80 100.00 36 5600 15 200/40
Walcom XL 9 95 94.74 36 5800 14 160/32
Renard VI 8 80 100.00 45 12000 14 200/40
Walcom XLS 11 95 115.79 45 12000 14 160/32
Dual Submachine Damage Delay DPS Level Bounty Weight Clip
Renard x2 14 90 155.56 0 60 30 160/32
Walcom S5 x2 16 90 177.78 13 1350 30 180/36
Ellan x2 10 90 111.11 12 1260 24 300/60
Renard V x2 14 85 164.71 27 5040 30 160/32
Walcom S6 x2 18 95 189.47 27 5040 32 180/36
New Renard V x2 16 80 200.00 39 10080 30 200/40
Walcom XL x2 18 95 189.47 39 10440 28 160/32
Renard VI x2 16 80 200.00 48 21600 28 200/40
Walcom XLS x2 22 95 231.58 48 21600 28 160/32
Shotgun Damage Delay DPS Level Bounty Weight Clip
Breaker 3 6 1100 65.45 5 200 15 15/3
Breaker 5 6 1000 72.00 10 800 18 25/5
Breaker 6 7 1000 84.00 15 1600 20 25/5
Breaker 7 8 1000 96.00 30 8000 20 25/5
Avenger 10 1200 100.00 30 9000 15 10/2
Breaker 8 9 1000 108.00 45 20000 20 25/5
Avenger MK.II 11 1200 110.00 45 24000 16 10/2
Rifle Damage Delay DPS Level Bounty Weight Clip
Nico R2 11 120 91.67 5 400 15 160/32
Nico R5 12 110 109.09 10 1500 18 160/32
Walcom Warrior 77 15 100 150.00 15 2800 20 120/24
Maxwell LX30 13 80 162.50 18 3000 20 200/40
Nico R6 15 90 166.67 26 6000 18 160/36
Maxwell LX44 14 80 175.00 34 12000 20 200/40
Nico R7 16 90 177.78 42 24000 18 200/40
Walcom Warrior 88 19 100 190.00 50 48000 20 160/32
Rocket Launcher Damage Delay DPS Level Bounty Weight Clip
Maxwell RW-66 30 1000 30.00 10 2000 30 16/4
Walcom L1 50 1200 41.67 15 3200 30 12/3
Maxwell RW-77 35 900 38.89 20 5200 28 20/5
Walcom L1 MK.II 55 1200 45.83 30 12000 30 12/3
Maxwell RW-88 36 800 45.00 40 24000 28 20/5
Walcom L2 55 1200 45.83 50 50000 25 16/4
Machine Gun Damage Delay DPS Level Bounty Weight Clip
Nico MG-K8 16 100 160.00 25 8000 28 240/120
Nico MG-K9 17 100 170.00 35 16000 28 240/120
Nico MG-KX 18 100 180.00 45 32000 28 240/120
Medical Kits Delay Clip Weight Level Bounty
Medical Kit MK-1 1000 2 5 0 400
Medical Kit MK-2 1000 3 6 20 5000
Medical Kit MK-3 1000 4 7 40 20000
Repair Kits Delay Clip Weight Level Bounty
Repair Kit MK-1 1000 2 5 0 400
Repair Kit MK-2 1000 3 6 20 5000
Repair Kit MK-3 1000 4 7 40 20000
Frag Grenades Delay Clip Weight Level Bounty Damage
Canox FG1 1500 2 2 0 200 100
Canox FG2 1500 3 3 11 500 100
Canox FG3 1500 4 4 22 1000 100
Canox FG4 1500 5 5 33 2000 100
Canox FG5 1500 6 6 44 4000 100
Flash Bangs Delay Clip Weight Level Bounty
Canox FB1 1500 2 2 0 200
Canox FB2 1500 3 3 10 500
Canox FB3 1500 4 4 20 1000
Canox FB4 1500 5 5 30 2000
Canox FB5 1500 6 6 40 4000
Smoke Grenades Delay Clip Weight Level Bounty
Canox SG1 1500 2 2 0 200
Canox SG2 1500 3 3 12 500
Canox SG3 1500 4 4 24 1000
Canox SG4 1500 5 5 36 2000
Canox SG5 1500 6 6 48 4000
|
|
|
|
|
|
|
|
|
|
|
|
|
|
|
Posted: Sun Feb 03, 2008 4:08 pm
|
|
|
|
|
|
|
|
|
|
|
|
|
Posted: Sun Feb 03, 2008 4:12 pm
Gunz Advanced Korean Style Techniques Guide
Wall-Canceling
To do a Wall-Cancel, Stand perpendicular to a wall. Have melee active. Run at the wall, jump, jump off the wall, slash, dash at the wall, jump off the wall, slash, dash at the wall, jump off the wall, repeat. This is a basic move to keeping yourself in the air.
Multiple-Wall Run
This is a harder move, due to the small angle-of-approach used for a wall-run. I've taken a picture of the proper angle of approach for a wall-run.
As you can see, you can't approach from a large span. So when doing this move, keep this angle in mind.
To do a Multiple Wall-Run, start a Wall run on a wall. When you near the end of the wall/run, jump off, slash, turn 180 degrees, dash at wall, and double-tap space bar. This is a tough move to get down. You can turn this into a continuous wall-run by not doing a 180 degree turn. I've taken replays of both to give you a better understanding of what to do.
Light Step
This will train your fingers for the half-step and flash-step. It's a pretty useless move, all it does it let you dash twice in midair.
To Light-Step, jump, dash, slash, and dash.
Butterfly-Step
A fundamental of sword fighting.
To Butterfly-Step, Jump, Dash, Slash, and Block right after the slash.
The Slash-Shot
Yeah, now you'll learn how to do the famed slash-shot =]
To Slash-Shot, Jump, Dash, Slash(HOLD), Change to a Gun, Gun will shoot.
Advanced K-Style
Now onto the advanced moves, these are what makes a K-Styler so good =]
Half-Step
Once you get this move down, chances are you wont use the Slash-Shot anymore.
To Half-Step: Jump, Dash, Slash(HOLD), Change, Dash(RIGHT AFTER CHANGE), Gun will shoot.
Eighth-Step
Apparently this is not the half-half, but it sure works hella better.
Another Variation of Half-Step, with 3 Dashes.
To Half-Half Step: Jump, Dash, Slash(HOLD), Change, Dash(RIGHT AFTER CHANGE), Jump, Dash, Gun will shoot.
Flash-Step
A Move that lets you slash twice in one jump. This is a very versatile move.
To Flash-Step: Jump, Slash, Change to gun, Change to melee, Slash
You can switch up this move by throwing in dashes and the such.
Unblockable Massive
An unblockable massive strike. Simply turn around 180* when you encounter a blocker with a massive strike. They will get hurt by the massive, but they will still be in block mode, so you must aim the feet.
"Instant-Kill"
The "Instant-Kill" is a move that uses the alternate swing of the sword to do. What you do is knock the enemy in the air, then aim at the apex of the knock, and fire. You can either then take this move separate ways:
Butterfly near landing point -> Knock Shoot near landing point -> Knock Knock and repeat.
Wall-Post
The Wall-Post is a move that I started to use. Basically a Wall-Post is a Half-Step off of a wall instead of the ground.
To Wall-Post: Jump, Dash at wall, Slash(HOLD), Jump, Change, Dash away from wall, Fire
Air-Reload
This can only be done in certain points of maps. It's basically sustaining yourself in the air while you reload, so you can keep yourself safe and/or get away at the same time, while reloading your gun.
Quickmedding
Quickmedding is a basic skill that allows you to drop meds twice as fast.
YOU MUST HAVE 2 SETS OF MEDS EQUIPPED FOR THIS TO WORK.
To Quickmed, keep running at a wall, take out the first set of meds, and drop it (HOLD DROP). Change to second set of meds, it will drop, then change back to first set, it will drop, then change to second set. Do this for how long you need to.
Slashmedding
A rarely-used move, but sometimes helpful. It's just like a slashshot, but with a MedKit/RepairKit in the hand. In this move, you hold Fire till you hit the ground, at which the medkit will drop. After this, you should light step over the medkit to ensure you picking the medkit up. Remember that the medkit will drop in the direction you are moving, so make sure to plan your pickup in the way the medkit is going to move to.
Equipment for K-Stylers
So, wondering about what equipment you should be carrying? There are many good combinations for K-Stylers, here are some below. I'm rating the combinations from 1 Star (*) up to 5 stars (*****) as I see it in my opinion.
Shotgun - Shotgun : The most common combination seen, and arguably the easiest to use, and most powerful. Shotguns do good damages at medium range, but when it comes to long-range fighting, you'll have to get closer to deal some damage. (*****)
Shotgun - Revolver : Another good combination. This gives you the ability to do damage at both long ranges and short ranges. (*****)
Revolver - Revolver : A tougher combination to use, since at closer ranges you will lose the ability for a spread hit and non-concentrated damage. Also, revolvers tend to be pretty accurate, and lag may become an issue on your accuracy. (***)
Shotgun - Rocket : Another good combination, although the rocket will not work at long ranges. (****)
Revolver - Rocket : Good damages at long range and short, although I'd prefer a shotty over a rocket anyday. (****)
Rocket - Rocket : A tough combination to use, but if used correctly can be very formidable. You lose any hope of damaging at long ranges, so any Rifle/Revolver users out there will tear Rocket/Rocket users up. (**)
Rifle - Shotgun : You now only have one "SS"-able weapon now, so you'll be going hybrid now. This is a very unexpected combo as most players don't expect a SG user to whip out a rifle at any given point. (****)
Rifle - Revolver : Meh. Another long-ranged base set, I'd prefer going Revolver/Revolver for the concentrated damages. (**)
Controls Many newer and older K-Stylers are still trying to get in a comfortable stance on the keyboard to play K-Style. There is a right stance for every person, and it takes some time to get used to newer stances. There are 2 Basic Stances, If anyone has some that they would like me to add, please reply.
Default Stance
Using the games default controls. I use this, I've never had any problems. Many people say that reaching 1 2 and 3 is too hard for them, although I have to problems getting to them. Pinky on Shift, Thumb on Space, Ring for W A S 1, Middle for W S D 1 2 3, Pointer for W A S D 2 3 4 5. Fingers in this stance will change roles on certain keys a lot, Example: During a Flash step my middle and ring go up to 2 and 1 respectively, while my pointer dashes on WASD. Here's an image guide:
QEF Stance
Changing 1,2 and 3 to Q, E, and F respectively. People with smaller hands will like this better than the Default Stance. This makes 4 and 5 hard to access, and makes slashmedding virtually useless.
|
|
|
|
|
|
|
|
|
|
|
|
|
|
|
Posted: Sun Feb 03, 2008 4:14 pm
Advanced GunZ European Style
Rolling
This is mainly used if you are in a fight, or just trying to avoid quickly from someone but don't switch to your sword. This is NOT to be used to get around. The only downfall with rolling is that once you start it, you can't stop. You're pretty vulnerable, like someone who lunges with a dagger. In this sense, you must be aware of your surroundings. You don't want to roll right into a wall, because then you're a sitting duck.
Dashing
Used effectively when you are trying to run, or get somewhere fast. You will most likely be on the ground when this is happening, or if you're in the air, you'll be going around there. Learning to keep the dash moving and not breaking, however, is the main key. If you're over a pit of doom, knowing how close you are to that point of death is essential.
Shooting
This is tricky. For example, if you're sniping someone with revolvers, then you don't want to be holding the mouse button down, yet you would for something like a Rifle. Knowing where your opponent will be is also essential, seeing as you must predict their movements. If you've only got a small window of opportunity to shoot someone before they grab health, predicting that moment is key to taking down your enemy.
Grenading
Not something I'm too big on, but still, this can be key. You would not want to waste a grenade on just one person out in the open. Use it when there are groups of people out in the open. Also, these can be essential to root someone out of their hiding spot, or just to damage them if they persist to stay.
Advanced E-Style
Now comes the fun part. Tactics. Knowing your enemy. Listening to your surroundings. Everything is an advanced part of any style, but most specifically of the E-stylers.
Wall Canceling
A basic move for those K-stylers, yet an advanced part of E-Stylers. In that sense, please refer to earlier in the guide as to how to accomplish this. For a sense of feeling, try moving around on the walls above the pits in Island. Albeit, after you've learned how to do it on a basic wall.
Tactics
This is probably the MOST essential part of playing. You cannot be afraid to use things that are "noobish" and what not. If they're typing, kill them. If they're afk, kill them. If they're coming around the corner, have a massive ready, stun them, then waste them away with your guns. Essentially, be prepared for whatever is coming for you. Grabbing health when you don't need it, and possibly someone on your team needs it, but the enemy also needs it. In that sense, you are 'somewhat' of a freelancer, but it is for the essentials of the team.
The Enemy
You can't go in knowing nothing. If you refer to Recu's part of knowing your enemy, that's good to know. Also, you must know if you're enemy will go around, or if they'll come charging in. Knowing if they have long range and short range is good. You must outwit your opponent, surprising them at every chance.
Sniping
This is probably a harder aspect than it seems. You will have troubles at first most likely, but you may get used to it. Sniping doesn't mean just distance. It also means close range. Predictions upon where your opponent will be within half a second. Recognition of the usual movement they do. Reacting to when they move unexpectedly. Shooting a specific part of their body depending on if they have a sword out or not.
Guarding
yes, this is advanced. Just rushing into somewhere while guarding will get you killed. Consequentially, guarding the whole time while someone is butterflying you will get you killed. You must raise your guard at the last possible moment, thus knocking your opponent off guard. It doesn't end there. If you've got a stun, turn around 180, stun, turn back, and then SHOOT. Do NOT slash. Using a gun is the most effective thing.
Slashing
You're probably thinking I'm talking about K-Styling with all this sword talk. Believe it or not, E-Stylers must use their sword just about equally as much as they use their gun. Anyways, back to slashing. If you charge an opponent, and they're a K-styler, slashing on the ground is a BAD idea. Instead, jump and slash. This will give you the quick recovery rate to pull out your gun, turn around, and shoot them. If the person is another E-Styler, then slash once while on the ground, then slash once again, and again, and again. If you combo your moves, then that leaves you open for attack. Also, slashing the initial slash only is, in my opinion, faster.
Equipment
There are too many combinations of weapons, so I will simply go through basic ones, and maybe a few combos.
Revolvers - This is good for distance, as well as, once in awhile, close combat. Packing quite a punch, you should be able to take someone down anywhere from 3-6 shots, depending on where you hit, and how powerful the gun is. However, trying to hit someone who lags is next to impossible with these.
Pistols - These can actually be quite effective. Their rate of fire is fast, and are quite accurate. They can also be used to keep someone in check behind their wall while an ally goes around and gets them from behind. Once again, bad for laggers.
Shotguns - Not one of my favorites, but if you can use them right, they're good. They deal more damage than the revolvers, but only if you're close. Pretty good against people who lag too. If you like being in the fight, yet want to do damage, this is the gun for you.
SMGs - These are effective too. You must burst them, not spray them though. With their quick rate of fire, you will be able to soak up someones AP in not time, thus leaving them prey to another weapon of yours, or just your sword. These should not be used in both slots of weapons though, EVER.
Rifles - Highly accurate, and pretty fast. Someone who uses these will most definitely be a sniper. Keep your distance, and shoot away. Pretty good against laggers, and if you can't trace a K-Styler, good for you! Spray.
Rockets - God these are painful. They are effective in combat as well as to root someone out. They are ineffective against people with high armor though, so beware. And laggers should beware. These will most likely hit you.
MGs - These are quite tactical, and highly effective. Use it against groups of people, or in narrow alleys. They pack quite a punch, so use them. They should be good against laggers too.
Rev-Rev - A good distance and close range combo. It's what I use personally. Your enemies will fear you if you keep hitting with these.
Rev-Rifle - A more of a long range combo. Even then, using your rifle to soak up AP so all damage from your revs goes straight to their health. With a 30 or so damage pistol, you can take an enemy down in three shots once you've wiped their AP (and some HP) with your rifle.
SG-Rev - Another power combo. Perfect for those who end up in a close range battle, yet still can snipe.
MG-Rifle - Pick one. You don't need both.
Pistol-Rev - Pistols to quickly hit someone, then finish them off with your Revs. I like, but I'd probably go with Rev-Rev.
SG-SG - I think you'd be better off with just one of them. I doubt you'd need two, unless you're going K-Style. Traitor.
|
|
|
|
|
|
|
|
|
|
|
|
|
|
|
|
|
|
Posted: Sun Feb 03, 2008 4:17 pm
IF u guys would like More Info Plz go to Gunzfactor.com
i have gotten these info from that site
|
|
|
|
|
|
|
|
|
|
|
|
|
|
|
Posted: Thu Feb 07, 2008 7:10 pm
If u really want to teach them make a movie and show it or
post a link with the tutorial razz
|
|
|
|
|
|
|
|
|
|
|
|
|
|
|
|
|
|
Posted: Fri Feb 08, 2008 9:17 pm
i dont wanna make a movie takes too long u make it
|
|
|
|
|
|
|
|
|
|
|
|
|
|
|
|
|
|