|
|
|
|
|
|
|
|
|
 Posted: Tue Apr 15, 2008 11:24 am Posted: Tue Apr 15, 2008 11:24 am
INTRO:
Before I get into things I want to clarify a few things. First of all I'm only going to be getting into one type of molding, do not think that this is the only way to do things!! This is just what I know and what I think would be usefull to the most members of the guild. If someone wants a tutorial on a different kind of molding then I'd be more than happy to do it or to walk you through it personally as long as its not finals time sweatdrop lol I chose this type of molding because it seems to me that most of the people here sculpt as a hobby rather than a career, so this is the cheaper, simpler way of making a soft mold. Also, I will not be getting into casting in this tutorial, mainly because there are SOOO many things that can be used to cast and it would take way too long for me to get into even the ones that I know, and I don't even know a fraction of them. At the end of the tutorial I'll make a list of the things that I have cast in before and if you would like some advice on casting in any of them just ask. =^_^=
DISCLAIMER:
This may seem pretty obvious, but you never know what people will do, so:
IF YOU HAVE AN ALLERGY TO LATEX DO NOT MAKE THIS TYPE OF MOLD!!!!!!!!!
|
 |
|
|
|
|
|
|
|
|
|
|
|
|
|
Posted: Tue Apr 15, 2008 11:25 am
IMPORTANT NOTES ABOUT MOLDING:
What you make your mold out of depends on what your making a mold of and what your going to be casting in it.
- If your making a mold of somthing soft, such as oil-based or water-based clay, and/or your going to be casting in a soft material, like foam latex, your mold should be made out of a hard material.
- If your making a mold of something hard, such as a hard clay, and/or your going to be casting in a hard material, like resin, your mold should be made out of a soft material with a hard shell around it to help it keep its shape.
These are very important to remember because, depending on the shape of things, it would be virtually impossible to pull a hard casting out of a hard mold without doing significant damage to one or both the casting and the mold. And a soft cast in a soft mold, that would get into problems with things keeping shape.
WARNING! Everyone needs to keep in mind that if your not careful and don't prepare things right it is VERY possible that the original that is being molded could be destroyed in the process! This is VERY LESS likely when making soft molds though and also depends on what your molding. Its much more common when making hard molds of soft clay, where the original is pretty much always destroyed. If you are molding something that has been painted then there is a good chance that there may be some chipping of the paint.
WARNINGS ABOUT LATEX
-Latex has LOTS of ammonia in it!!! DO NOT BREATH IT IN!! ALWAYS WORK IN A WELL VENTILATED AREA!!!
-LATEX SHRINKS!!! It only shrinks a very tiny bit, but it DOES shrink over time.
-Latex will rip if enough stress is put on it. Thats why we put the burlap in it, but if you missed a spot with the burlap, it might tear with repeated uses.
-Latex will yellow with time. Don't worry its not "going bad" this is supposed to happen
-Always store latex in an airtight container and out of sunlight.
|
|
|
|
|
|
|
|
|
|
|
|
|
|
|
|
|
|
Posted: Tue Apr 15, 2008 11:26 am
SUPPLY LIST - Krylon Crystal Clear OR Shelac - Liquid Mask Latex - Cabosil - Burlap - Plaster Bandages - Popsicle sticks - Vaseline - Chip Brushes (lots) - Scissors - Small/medium Containers (Sufle(sp?) cups work well) - Medium sized bowl (plastic is best) - Hair Drier
|
|
|
|
|
|
|
|
|
|
|
|
|
|
|
Posted: Tue Apr 15, 2008 11:27 am
SECTION 1 Preparing Your Sculpture (or whatever you want to mold) First of all I would not recommend this process for anything 5-6 inches or smaller just because with the burlap and the plaster bandages things would get a little too bulky for something that small. For things that small, I don't think that it would cost too much more to do a small silicone mold, which is really simple and I can go through it in this thread after this tutorial is done if enough people want me to. The first thing you need to do is look at your sculpture and decide if there are any major undercuts. An undercut is a place on your sculpture where the mold could get "locked on" and make de-molding very difficult in our case or even impossible(without making a total mess of things) This image gives a good example of undercuts I think (I did not make that image!!!) An undercut can be like that or it can look like a kind of a "hook." Common places for undercuts are chins, noses, hands/limbs, ears or hair. many times problems with undercuts can be avoided by repositioning the object being molded. Since we will be cutting our molds off your going to want to remember where your undercuts are and start trying to figure out where you want to cut. Idealy you'll end up with two halves of your mold, so if you put the undercut on the line where you'll be cutting, like this, then you'll be fine. Since undercuts aren't the easiest thing to explain, if you would like me to look at what your molding and give my opinion on what you should do then post or PM me with a link to a photo of your sculpture/object. NEXT!! Your gonna want to seal your sculpture. Usually I use Krylon Crystal Clear, you can get it in the painting section of Home Depot or WalMart. But if you have painted your sculpture then your gonna want to use something a bit stronger to protect your paint job. For this I would recommend shellac(Always follow instructions on container and work in a well ventilated area!!) THEN!!! Make sure that your sculpture can stand upright on a flat surface and will not tip over. The surface of your object that it is standing on WILL NOT BE MOLDED, so make sure that there is no essential detail sitting face down on the table. If your object does not stand well on its own, you can use hot glue to help it stay put, just make sure that none leaks out onto the area your molding. In fact even if it does stand alright on its own, I still recommend gluing it down. Make sure that if you bump it while your working it won't fall over. You never know =^_^= After you get your sculpture all ready to mold you need to get your materials ready. - Have small cups ready on the side to use to mix the latex and cabosil. Sufle(sp?) cups work very well and are cheap. Also have something to use to mix with. I think popsicle sticks work best. NOTE: Cabosil is a thickener made from very very finely ground glass. Keep cabosil containers close at all times, the stuff is so light that it flies everywhere with the slightest movement and its definitely not something you want to be breathing in. - Cut your burlap into pieces of an appropriate size for what your molding. For example, if your piece is 4-7 inches in size pieces that are around 1-2 inches in squares and strips. They don't have to be exact though. - Have your chip brushes and containers of latex and cabosil out and ready to use.
|
|
|
|
|
|
|
|
|
|
|
|
|
|
|
|
|
|
Posted: Tue Apr 15, 2008 11:29 am
SECTION 2
Latex and Burlap
First make sure you've got everything prepared with your supplies out and your sculpture sealed and you know where your going to cut the latex off.
1. Your going to start with just straight mask latex(use a cup for the latex, don't take it straight from your main supply because it could dry out and get thick and thats no fun to work with) using a chip brush(I usually use one of the smaller ones to start with) and doing VERY thing brush coats. You have to make sure that each coat is dry before you start the next and always be careful when putting latex on latex because it sticks to itself so. This is why you want to have a LOT of brushes on hand because if the latex starts to dry on the brush and gunk it all up then the brush is going to start sticking to the already dry latex and things just get all messed up. So if your brush starts getting all clogged up don't be afraid to just toss it out, thats why we use chip brushes, cause they only cost about $.40.
In between layers you can use a hair drier to speed up the drying times.
After you have about 9 or 10 layers down and dry then you can start with the next step, you want several layers because then have all of your details filled in and some thickness built up on top of it. So if you do end up having a bubble or two then at least you'll get one (hopefully) perfect casting before but bubble shows up, even after that bubbles aren't hard to fix.
2. Once the last of your brush coats are dry then you want to get your cabosil, your latex, and another one of your small/medium cups. Fill your cup about half full with latex and then VERY CAREFULLY start adding the cabosil. I usually just use a spoon and scoop it out very slowly and carefully. Cabosil is ground so fine that the slightest breath could send it flying everywhere, so try your hardest not to breath on it, you don't want to be breathing this stuff in. Its not really dangerous per say but its never good to have foreign substances in your lungs. Adding a little bit at a time, mix it very carefully with a popsicle stick until all the cabosil is wet with the latex. Do that until there's a good amount of cabosil in the latex and then your going to stir like your life depended on it. One of my teachers used to say "Stir till your arm feels like its gonna fall off, then switch hands and stir till that one feels like its gonna fall off. Then do it all over again!" You want to keep stirring and mixing in cabosil till your mixture is about the thickness and consistency of cake icing. NO LUMPS ALLOWED! If its still lumpy, then keep stirring.
Now, once your latex-cabosil mixture is nice and smooth and the right thickness your gonna take your brush, scoop some up and start smoothing it onto your sculpture. Make sure to watch for places where air can get trapped and use the tip of your brush to make sure you get the latex mixture into it. Poke at those places with your brush periodically. Now this coat is going to be about 1/4" thick and should fill in any major details that are left so you should have, for the most part, a nice smooth surface with no big lumps or anything. But of course every sculpture is going to be different so just make sure there's nothing major sticking out cause the burlap is going on top of this and it needs to be able to lay flat. Also, try not to get it any thicker than 1/4" cause the thicker it is the longer it will take to dry.
This layer is going to take quite a while to dry so you can walk away and do something else for a few hours. If you set up your hair drier to point at the sculpture it will speed things up, but make sure if it falls it won't knock anything over that would make a big mess, (it is VEERRYY hard to get latex out of carpet or any other fabric!!) and especially not your sculpture! Come back periodically to adjust your drier to a wet spot when one spot is dry.
After and ONLY after the thick layer has dried can you move on!! If you don't wait for it to dry then its going to take even longer to dry in the end and you might end up having to wait a week before using it.
3. After the last layer has dried then comes the REALLY messy part, so be careful and try to keep things clean to make cleaning in the end faster and easier! ^_^
Now basically what your doing in this step is putting a layer of latex-soaked burlap on top of the last cabosil-latex layer. So you want to have a container of latex at the ready near your sculpture (Again don't use your main supply because it could dry out and all kind of burlap strings will get in it and make it all icky and pretty much unusable) and your cut pieces of burlap near you as well. Your going to be dipping the burlap into the latex, on BOTH sides, (a dry spot means and air bubble), wiping off a little of the excess, just so it doesn't drip all over everything, and then slappin it on top of the last layer. Try not to overlap the burlap but also don't leave any empty spots. After you put each piece of burlap down use your fingertips and tap it repeatedly moving from the center out to the edges. This will get rid of air bubbles. Once the sculpture is covered in burlap then do a quick brush coat of just latex over the burlap.
Recap for the Burlap:
1. Dip the burlap into the latex so its soaked on BOTH sides.
2. Wipe off some of the excess.
3. Lay it flat onto the sculpture.
4. Tap with your fingertips moving from the center out to the edges to remove air bubbles.
5. Repeat till sculpture is covered with no blank spots or overlaps.
6. Do a quick brush coat of just latex over the burlap
Wait for the burlap to dry, this shouldn't take as long as the last layer but it'll still take some time so use your hair drier and find something to do for a while.
After the first layer is dry, then then repeat, but this time rotate the burlap that you lay down 45 degrees so the weave of the burlap is going in a different direction, this will add strength. Also try to lay pieces over the seams where the burlap pieces in the last layer met. And yet again, wait to dry.
Repeat this for a total of 3-4 layers. The purpose of the burlap is to add strength and thickness. So if you want a stronger mold then add more layers of burlap, although I wouldn't recommend more than 5 layers, it just get kinda ridiculous after that.
4. Once all your burlap is dried then you want make another mixture of cabosil and latex, follow the instruction I said before in step 2. Make sure its smooth and the thickness and consistency of cake icing. Your going to do another 1/4" layer of this on top of the burlap, using the same process, making sure there's no air bubble and such. But this time you should have a small cup of water by you and once you have the layer of latex and cabosil down, take a CLEAN brush, wet it with the water and very gently run it over the latex to smooth it out. Make sure you brush stays clean and damp.
Now all thats left for this part is to wait for it to dry!! Usually you would wait at LEAST 24 hours for it to dry, 48 would be better.
|
|
|
|
|
|
|
|
|
|
|
|
|
|
|
Posted: Tue Apr 15, 2008 11:31 am
SECTION 3
Plaster Bandages
So now that you've got this lumpy weird looking hunk o' latex, what next, right? Believe it or not this part should be pretty simple. What your going to be doing in this step is making a hard shell for your mold so it will keep its shape. In most cases your going to have two halves to this shell and we'll be making them one at a time. So after the latex is dry enough to be firm, first spray a layer of Crystal Clear onto the latex just for safety's sake then break out your plaster bandages and scissors. Remember about undercuts!! If there is still an undercut on the outside of your mold then make sure your putting the halves of your shell in a place where they won't get locked on.
First thing you want to do is figure out where the center of your mold is, where there is no undercuts for the bandages to lock on to, and, using a sharpie, draw a line to follow while your putting on your plaster bandages.
1. Your going to measure out how long each strip needs to be using your now latex-covered sculpture. Going horizontally, in rows. So begin to unroll your bandages and hold it up to your sculpture to measure how much you need for the first half, I usually start at the top and work my way down. Once you know how long each strip needs to be then fold that length over three times so you have four layers of bandage for each row. Cut all of your strips out before you start laying them on, keeping them in order from top to bottom or vice versa.
2. Once you have all of your strips measured, cut and set to the side, got get a medium sized bowl of water to wet your bandages in. Don't use a nice bowl that you don't want to get messed up, just in case you end up leaving it sit for a while(plaster will set up on the bottom of the bowl if this happens) and definitely don't use a metal bowl(plaster bonds to metal permanently). After the crystal clear is dry, which should only take a couple minutes, Start dipping your bandages in the water, making sure to keep them nice and flat and not twisted up or folded over. Once your strip is wet hold it up over the bowl with one hand and with the other hand take your index and middle finger and kinda loosely scissor the wet bandage between your fingers at the top then drag down to the end to get rid of excess water.
3. Now, starting with the top row, lay the bandage down, OVERLAPPING the line you drew by about a half an inch. Once its down, fold over the overlapping edge twice to make a raised rib alone the edge that follows your center line thats about 1/2 inch wide. You'll do this along the entire center edge! (This will help make the shell be stronger, since plaster bandages aren't the sturdiest of materials)
4. Repeat step two for each strip and lay them all down in the right order. Don't forget to fold over the center edge!! You might have to cut out some odd shapes or extra strips for gaps and things. Don't forget to do at least four layers for these as well.
5. Once you have all your layers down and this half of your mold is covered wait for about 20-30 minutes until the plaster bandages have cooled down (plaster heats up as it hardens). Once its cool take your vaseline and cover the center edge in it, about 1-2 inches in along the entire length of the edge. (this is a mold release to make sure the two halves don't bond together because plaster sticks to itself quite effectively) If you don't do this or if you miss a spot then you'll have to cut/break off your bandages, hope that you don't damage the latex, and do it over again the right way.
6. Repeat steps 1-4 on the other half, overlapping the first half just enough so they will fit together nicely, but not so far in that you go over the raised lip entirely, that will lock the two halves together.
|
|
|
|
|
|
|
|
|
|
|
|
|
|
|
|
|
|
Posted: Tue Apr 15, 2008 12:18 pm
SECTION 4 De-Molding Once the last of your plaster bandages have cooled down it should be fairly easy to pry apart the two halves as long as you put vaseline on the first half. But still try and be gentle, don't just yank them apart. Plaster bandages can still be kind of flimsy until they're completely dry after a day or two. So set your two halve aside somewhere where they won't have anything set on top of them or anything equally traumatic while they finish drying. Now to remove your latex. Depending on your sculpture this should be done VERY CAREFULLY!! In the case that your sculpture has no extravagant appendages or anything sticking out and is basically not much more than a dome in shape, you can just peel your latex right off and your done! Hooray!! In the case that your sculpture isn't so conveniently shaped, what your going to be doing is cutting a vertical slit up one or more sides and very carefully peeling it off that way. I would highly recommend NOT doing more than three slits. Only one slit would be ideal, but sometimes things just don't work out that way. ^_^ You want to place your slit/s in places that would put the least stress possible on the more fragile parts of your sculpture. Here's a picture for an example! Behold my wicked Paint skilz yet again!! XD 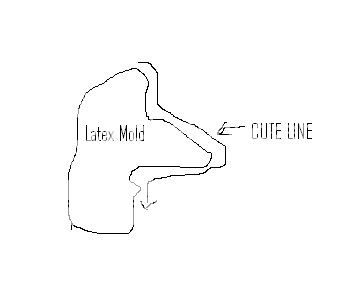 If you do only one slit then cut to about the top center of your mold. If you do more than one slit cut each one to not quite the top center. I would say don't leave less than 3-4 inches, but in this case its kinda relative to the size and shape of your mold. CUT VERY CAREFULLY! Especially if you have a paint job that you don't want to scratch up. After the slit/s are cut then very carefully peel off the latex and then your done!! Celebrate in your newly found mold making greatness!!! Remember to always clean up your work area and make sure to properly store your tools, supplies, and materials! =^_^=
|
|
|
|
|
|
|
|
|
|
|
|
|
|
|
Posted: Tue Apr 15, 2008 12:35 pm
SECTION 5 Setting up to cast in a latex mold & References PREPARING TO CAST 1. Place latex into the plaster bandage halves 2. Thoroughly wrap in duct tape to keep halves together. NOTE: Duct tape doesn't really stick to plaster really well, so wrap it once and then just rely on the duct tape sticking to its self 3. Use duct tape to line the bottom edges of latex to the plaster. 4. Spray inside with Crystal Clear. Depending on the shape of your mold you might want to do this before you put the latex into the halves. I used images from these sites in this tutorial: http://www.danperezstudios.com/workshoppages/molding_casting.htm
|
|
|
|
|
|
|
|
|
|
|
|
|
|
|
|
|
|
Posted: Tue Apr 29, 2008 12:04 pm
PHEW! xd Finally done! Sorry that took so long everybody! I had no idea it would be so long! biggrin Let me know what you think if my first tutorial and never hesitate to ask whatever questions you have. There's no such thing as a stupid question!! =^_^= I hope you all enjoy it and find it informative and educational!
|
|
|
|
|
|
|
|
|
|
|
|
|
|
|
|
|
|