Welcome to Gaia! ::

Everything Japanese, Victorian & Art (needle work, crafts, &

Back to Guilds


Tags: Japan, kimono, lolita, Victorian, craft 

Reply Crafts
Sewing Tutorial

Quick Reply

Enter both words below, separated by a space:

Can't read the text? Click here

Submit

Do you sew?
  Yes
  Not very well
  No, but I want to
  No
View Results

ani_cat_candy
Captain

PostPosted: Wed Jul 22, 2009 11:45 am


Sewing Tutorial
Lesson 1: Basic Equipment and Stitches


User Image - Blocked by "Display Image" Settings. Click to show.

What's the point of sewing when we can just buy everything premade, without any wasted time or effort?
There's several good reasons to pick up sewing. The first and most common being that sometimes they just don't sell exactly what we want, so we have to settle.. The clothing companies all use a basic "master pattern" for the size and shape of the garments, and not all of us have the same body shape! There are times when our favorite things (a shirt, dress, blanket, stuffed animal, etc.) need repairs- a ripped seam, missing button, broken zipper... And it's quite obvious for those of us who cosplay, or would like to cosplay as 99% of those outfits are literally impossible to find premade. It's a great way to pass time, lots of fun and very rewarding! Just imagine the look on your little neice's face when you give her a hand-made bunny!

Here's the items you need to get started (you can buy kits with all this in it - except the ones with a * next to it) :
  • Sewing needles (they come in a variety of sizes- I suggest getting a small variety pack so you can find what works best for you)
  • *Scisors (get the ones found with the sewing supplies to make sure they're sharp enough - no need to buy the most expensive pair, either, the cheap ones work just as well for small projects)
  • Pins and Pin Cushion (the kits come with the classic 'tomato' pin cushion, but you can also buy some that strap to your wrist for easier access -I really love those things!- and magnetic ones)
  • Tape Measure (a cloth tape measure is best, but any will do)
  • Seam Ripper (it isn't a nessesity, but VERY helpful)
  • Needle Threader (it usually looks like a small coin with a wire loop)
  • *Fabric (it's best to start out with basic cotton- you can either buy quilting blocks or -what I prefer as it's less expensive- remnents! They're just bits of fabric left over that are too small to bother putting back on the bolt) or, you can use paper to practice your stitches - plain notebook paper is great for practicing a straight line


Basic Stitches

1: Straight Stitch - it's your basic, all-purpose stitch that can be used for just about anything
Start off by pulling the thread up through the fabric until the knot catches, move over a bit and push it back through, move over a bit and pull it back up -simple ne?
User Image - Blocked by "Display Image" Settings. Click to show.

2: Running Stitch - a variation of the straight stitch
Just push the needle through to create the stitches, but you don't pull it through completely for every stitch, you can let them build uo quite a bit on the needle before pulling it through
I actually find it easier to get the stitches even this way

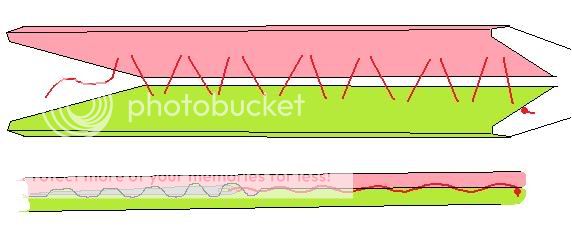
3: Back Stitch - it's stronger and looks nicer than the straight stitch
Start off as you would a straight stitch -pull the thread up until the knot catches, pull it through down and back up-
Now what makes it a back stitch- push the needle/thread back through where the last visible stitch ended, then pull it back up a bit away from the 'start' of the previous stitch- and continue in this fashion until complete
User Image - Blocked by "Display Image" Settings. Click to show.

4: Basting Stitch - Used to temporarily hold two pieces of fabric together
Most people think this is a useless stitch, but it IS very useful. I use it most in my kimono to hold the kise (a special seam I've only found used in kimono) while in storage or transportation. But for other things, it's great for holding pieces together to check that the pattern is going to work (if it's clothing- try it on after every few steps) and to keep peices from slipping out of place while going through a sewing machine
Just do a loose straight or running stitch with cheap thread - it doesn't have to match or be even as it will be removed later

5: Overcast Stitch - used to keep the edges from fraying
Pull the thread up from the wrong side of the fabric, then let it wrap around the edge and pull it up from the wrong side again
User Image - Blocked by "Display Image" Settings. Click to show.

6: Whip Stitch - an overcast stitch preformed within the fabric- great for hems
User Image - Blocked by "Display Image" Settings. Click to show.


Basic Terms

-The ones you'll see most often are Right Side (or RS) and Wrong Side (or WS)
The right side is the side facing you or that will be seen when the project is complete
The wrong side is the side facing away from you or that will not be seen when the project is complete
-Grain - the grain of the fabric is the direction the threads are going- the True Grain is found by playing with the raw edges of the fabric to see which one frays most- that is not the true grain, the thread/grain going against that edge (not with it) is the true grain
-Raw Edge - a raw edge is an unfinished edge of fabric

Your Homework:
Get yourself some fabric (or paper), a needle and thread and practice those stitches!
PostPosted: Wed Jul 22, 2009 6:37 pm


Sewing Tutorial
Advanced Hand Stitches and Getting to Know Your Sewing Machine


User Image - Blocked by "Display Image" Settings. Click to show.

1: Blanket Stitch - Very similar to the overcast stitch, but a bit stronger and more decorative
Just preform the overcast stitch, but make the needle go through the loop before pulling the thread tight
User Image - Blocked by "Display Image" Settings. Click to show.

2: Buttonhole Stitch - This one is easily confused with the blanket stitch. As the name suggests, it's great for making buttonholes
This stitch creates a Purl or a small loop at the edge of the fabric by making more of a knot than is found in the blanket stitch - look closely at the diagrams
User Image - Blocked by "Display Image" Settings. Click to show.

3: Cross or Catch Stitch - used for hems - it only catches a couple of threads, making it hard to see the stitching from the right side
User Image - Blocked by "Display Image" Settings. Click to show.

4: Blind stitch - used when you don't want the stitching to show on one side
User Image - Blocked by "Display Image" Settings. Click to show.

5: Double Blind Stitch - for those places you can't get to from the wrong side and don't want the stitching to show on the right side (great for finishing up the lining in a garment) -This is, in my opinion, the hardest stitch
The first picture is how it would look done loosely. The second shows how the needle slides through the fabric, only catching the inner-most layers, and how the thread lays once smoothed out.. you will want to iron the seam after doing this stitch as it will wrinkle it!
User Image


The Sewing Machine

User Image - Blocked by "Display Image" Settings. Click to show.

Obviously, every machine is different, but here's the basic machine parts:
  • Spool Pin -holds the spool of thread
  • Bobbin -holds the bottom thread -You can buy these pre-wound with white or black thread
  • Bobbin Compartment -Place bobbin here
  • Needle
  • Presser Foot -holds the fabric down while you sew
  • Presser Foot Lifter -raises and lowers the presser foot
  • Feed Dogs -located under the presser foot- helps pull the fabric through at the proper speed
  • Foot Pedal -push it to make the machine go
  • Balance Wheel -manually move the needle up or down
  • Reverse Lever -sew backwards (works with the foot pedal)
  • Bobbin Winder -pop an empty bobbin on it and push the foot pedal to wind your choice of thread onto it


Those are just the basic pieces found on every machine, and the only ones we need to worry about just yet.
Very important read the manual! Every machine is different, mostly in how to thread the machine and how to set up the bobbin- and your machine may be able to do some neat things that you wouldn't know about without reading the manual- like my newest one does a neat stitch where it makes hearts, flowers, several variations of the feather stitch (I'll talk about this stitch when we get to embroidery!) and a lot more
On most machines you also have dials to adjust the stitch length and style -the ones you will use most are the straight stitch and the zigzag stitch
-I say most machines because some people (including myself) own vintage or antique sewing machines- mine is one that folds down into the table and has a large, manual pedal.. unfortunately, I haven't had a chance to use it.. those machines can only do the basic straight stitch. Here is a similar one to mine.. but mine isn't a Singer. These babies are great for sewing through tough fabrics like leather, but very expensive and hard to find.

Back to our lesson!

To get started, set up the machine (thread the machine, put the bobbin in, and plug it in), place the fabric under the presser foot (the needle should be at it's highest position) with the bulk of the material to the left, not bunched up against the machine. The fabric is pulled away from you when you sew, unless you're using the reverse lever, so be sure you're starting at the top edge of the fabric (you can also use paper for practice). Now, lower the presser foot, gently apply pressure to the foot pedal and use one hand to guide the fabric to keep it straight, the machine will do the rest.

Be sure you don't use too much pressure on the foot pedal, you don't want it to take off on you, and keep your fingers away from the needle unless you are trying to sew the fabric to your hands!

Once you get the hang of it, you can make it go faster- just don't go too fast before you're ready. Not only could you sew your fingers to the fabric, but it can also get away from you and make the stitching all wacky.. then you have to use the seam ripper and undo it all, then re-sew it.. Trust me, that's no fun, especially when you sew a long piece.. gonk

Your machine will likely come with a couple of different presser feet, each with it's own use. The basic, all-purpose foot should come already atatched to the machine. The others you're likely to get are the buttonhole foot and the piping/zipper foot. You can buy other types (gathering foot, walking foot, embroidery foot, pin tuck foot, rolled hem foot, and many more) but they're rather expensive. I hardly ever use anything but the basic foot, it can do it all, just not as easily.

Your Homework:
Practice the new stitches on basic cotton or paper
If you plan on using a sewing machine: read the manual, learn how to work the machine, and practice some basic stitches.
To practice the stitches on a machine, draw some lines on your fabric/paper. Straight lines, curved lines, lines with sharp turns (you'll want to have the needle down in the fabric, lift the foot, turn the fabric, then lower the foot for nice sharp turns)

ani_cat_candy
Captain


ani_cat_candy
Captain

PostPosted: Thu Jul 23, 2009 12:30 am


Sewing Tutorial
Seams, and Hems


User Image - Blocked by "Display Image" Settings. Click to show.

A seam is merely where two pieces of fabric that are sewn together and a hem is a finished edge of a project.

There's a special machine called a Serger that makes a nice stitch over the raw edges of the fabric to keep it from fraying and makes it look more profesional. It's a nice little toy, but this can be done with a normal sewing machine just as easily. Just set your machine to a zigzag stitch and sew it so only one side of the stitch catches the fabric. It sounds silly, but it works. It will pull the thread tight against the edge of the fabric and, if the fabric is thin enough, it will gather up into a nice, neat 'serged' edge.

Your basic hem:

An important note before we start
Press any and all folds before sewing. It may sound like a waste of time, but trust me, I've made this mistake countless times and regret it every time! Not only does it make it easier to keep the pieces in place (like a fold for a hem), but it also makes the finished product look much more professional.

A basic hem is just a rolled edge, stitched with any stitch
When I say 'rolled' I mean the fabric is folded over twice
User Image - Blocked by "Display Image" Settings. Click to show.

Mitered Corner- I love these things, they look so professional!
1: fold the corner over so it folds at the edge of your hem, making a triangle, then fold the tip over so it won't show when finished
2: fold the sides over so they meet at a nice 45 degree angle - make sure the edge of the sides have been folded over (we're still working with a rolled hem)
3: hand stitch the sides together, then continue sewing the hem as usual

User Image - Blocked by "Display Image" Settings. Click to show.

Seams

Of coarse the basic, all purpose seam is just a straight stitch or back stitch holding two pieces of fabric together (top 2 pictures). The plain stitched seam merely has the raw edges folded or rolled and stitched (the bottom 2 stitches). This is important -there's two ways to press the seam- one is to fold it over in one direction (the main part of the fabric spread out as it will be when completed), or separate the pieces as shown in the diagram. the second is preferred.
User Image - Blocked by "Display Image" Settings. Click to show.

Flat-Fell Seam
a very strong seam -you usually see this seam on blue-jeans (those two lines of stitches aren't just for decoration)
1: do your basic seam
2: cut one side in half
3: fold the wider side over the thinner one
4: fold it over (same direction as step 3) and stitch it down

User Image - Blocked by "Display Image" Settings. Click to show.

Your Homework:
Make a pillow!
It's easy, just cut out 2 squares of fabric, stitch them together around the edges (but leave a small bit open) with the right side of the fabric together, press the seam as described above (don't bother with mitered corners), turn the fabric right-side-out using the opening left earlier, stuff it, then hand stitch the opening closed. Tada! You have just made a pillow!
Reply
Crafts

 
Manage Your Items
Other Stuff
Get GCash
Offers
Get Items
More Items
Where Everyone Hangs Out
Other Community Areas
Virtual Spaces
Fun Stuff
Gaia's Games
Mini-Games
Play with GCash
Play with Platinum