


Create a Character Tutorial
The first thing you will need to do is create your character. Be sure to have read the character creation rules in
the shop thread so you know what we allow. This thread is a tutorial for anyone who does not know how to
edit lines in a graphics program. If you already know how, you do not need to read this.
Click each image for a larger one.
Before starting you should pick out the species of animal your character will be. Also figure out what they
will look like and what they'll be wearing.

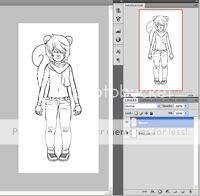
Step 1
Open the lineart file you will be editing in a graphics program such as Photoshop. For this tutorial I will be using Photoshop CS4 but most programs are similar enough and have all the basic functions that I'll be using. The lineart file is saved as a transparent PNG so when you open it there will just be the lines with no background.
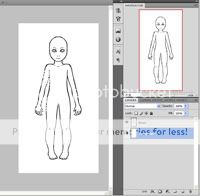
Step 2
You can make a background layer below the lines so you can see them better. I've named the white layer 'background' and the lineart layer 'lineart'.
Step 3
Lower the occupenty of the 'lineart' layer. Make a new later on top of the lineart layer and name it 'sketch'. Here you can sketch out what you want them to look like.
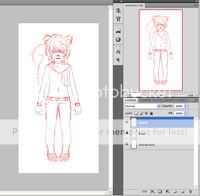
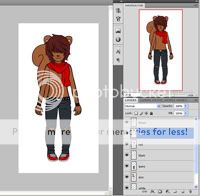
Step 4
When done create another layer on top of that and name it 'edits'. Lower the occupancy of the 'lineart' and 'sketch' layers. On the 'edits' layer you can now ink the edits you sketched out.
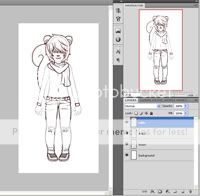
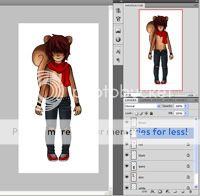
Step 5
Now delete the 'sketch' layer and erase the lines you no longer want from the 'lineart' layer.
Step 6
Bring the lineart layer up to 100% occupancy and merge the 'edits' and 'lineart' layer so they are both the 'lineart' layer. Do not merge with the background.
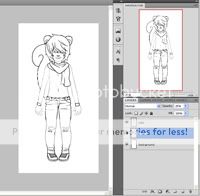
Step 7
It is now time to do the coloring. Make a new layer under the 'lineart' layer for each color you want to put. Once you have made layers and colored in all the areas, lock their transparency as it's time to shade.
Step 8
I would look around deviantart for some tutorials on shading depending on what program you have since I am not going into shading here.
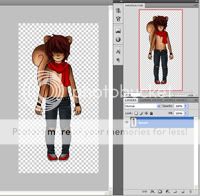
Step 9
How that everything is shaded, you will need to delete the 'background' layer and merge the color layers with the lineart layer so you have 1 layer with everyone on it and a transparent background. Save the PNG file still as a PNG. You can now take this file and cert it.
The first thing you will need to do is create your character. Be sure to have read the character creation rules in
the shop thread so you know what we allow. This thread is a tutorial for anyone who does not know how to
edit lines in a graphics program. If you already know how, you do not need to read this.
Click each image for a larger one.
Before starting you should pick out the species of animal your character will be. Also figure out what they
will look like and what they'll be wearing.

Step 1
Open the lineart file you will be editing in a graphics program such as Photoshop. For this tutorial I will be using Photoshop CS4 but most programs are similar enough and have all the basic functions that I'll be using. The lineart file is saved as a transparent PNG so when you open it there will just be the lines with no background.

Step 2
You can make a background layer below the lines so you can see them better. I've named the white layer 'background' and the lineart layer 'lineart'.

Step 3
Lower the occupenty of the 'lineart' layer. Make a new later on top of the lineart layer and name it 'sketch'. Here you can sketch out what you want them to look like.

Step 4
When done create another layer on top of that and name it 'edits'. Lower the occupancy of the 'lineart' and 'sketch' layers. On the 'edits' layer you can now ink the edits you sketched out.

Step 5
Now delete the 'sketch' layer and erase the lines you no longer want from the 'lineart' layer.

Step 6
Bring the lineart layer up to 100% occupancy and merge the 'edits' and 'lineart' layer so they are both the 'lineart' layer. Do not merge with the background.

Step 7
It is now time to do the coloring. Make a new layer under the 'lineart' layer for each color you want to put. Once you have made layers and colored in all the areas, lock their transparency as it's time to shade.

Step 8
I would look around deviantart for some tutorials on shading depending on what program you have since I am not going into shading here.

Step 9
How that everything is shaded, you will need to delete the 'background' layer and merge the color layers with the lineart layer so you have 1 layer with everyone on it and a transparent background. Save the PNG file still as a PNG. You can now take this file and cert it.


