|
|
|
|
|
|
|
|
|
 Posted: Sun Feb 13, 2005 12:53 pm Posted: Sun Feb 13, 2005 12:53 pm
So, you've finally started up on Initial D, and you've been told to do this thing called "Legend of the Streets". For those of you that are unfamiliar, Legend of the Streets is Initial D's "story mode". Basically, you'll be running your car against the rivals that are featured within the actual Initial D manga/anime.
Note that this little LOTS guide is designed only to get you familiar with the basics of every course in LOTS. Once you get to time attacking, however, that's a different story.
I'll be updating these guides as soon as I can.
Ok, so, we'll start it off with the first course.
Myogi
Strictly speaking, Myogi is all about learning the basic physics of the game. Unlike the Cruisin' game series, the wheel is not uber-sensitive and your handling must be more precise. Myogi forces the player to run through and learn how to drive cleanly.
There is one notable point in Myogi that one must take notice of, known to many players as the "Grand Curve". This turn requires that the player turn slowly and early. Ease the car into the turn. And, unlike Version 2, there's actually no need to off-throttle for this turn (at least, in dry) both ways, as long as your line is correct.
The only real worry you'll have is against Shingo. Shingo actually gets a speed boost in the middle of the race. This really shouldn't be a worry, though. If you're running Myogi correctly, the speed boost won't propel him close enough to catch you.
Usui
Usui. Home of the famous Mako and Sayuki, Impact Blue.
Ok, not too many changes come between racing on Myogi and Usui. There are two things to keep in mind when playing on Usui. One: You'll actually have to take your turns a little slower now, as wall contacts on the three major turns will greatly kill your acceleration.
The only real challenge on this course is, again, the last rival(s), Mako and Sayuki. However, they still will pose no threat greater than that of Itsuki on Myogi, provided that you don't touch the walls anywhere. Again, clean runs are stressed here.
Akagi
Welcome to your first real downhill/uphill! Akagi takes us off of the pseudo-circuits and onto a full-on mountain pass.
The Two Guys from Tokyo are your first race. And surprise, your first race on Akagi is actually uphill! Don't fret, though. The uphill is rather simple. The Two Guys from Tokyo prefer to do a fast in-slow out style of driving which you're going to take advantage of. Once again, through every corner, I stress that you take the cleanest line possible. Your acceleration will be your friend because of it. You're going to have to learn to use your brake a little more on this course.
There are a few key places that you'll need to watch out for on the uphill. The first is the V-turn that leads into section 3. You'll need some heavier braking for this turn than most other turns in Akagi (and for that matter, the turns in Usui). The next is deep in section 3 itself...a left-right combo. You won't need braking that's quite as heavy as the V-turn, but still, line is mucho important here! A tap on this turn will kill your acceleration all the way up to the next crucial point in the course: the butterfly turns. Through the butterfly turns, quick hands are a must for getting through these quickly. Cut your apexes and get through as cleanly as possible. And the last turn...the line on this turn tightens. If you're unsure of how to do this turn, take it slowly at first, until you find the right line.
And on to Kenta. Kenta's your first race on the downhill...and to your (dis)advantage, it's actually a race in the rain! Don't worry, though. It's really quite simple to face off against Kenta. Since you're in the rain, your car will have less grip (of course). Your best option is to, of course, take your corners slower and make sure that you clear every corner clearly. Kenta will probably have the lead on you in the beginning, but after that first left turn, you'll be fine.
Keisuke is your last challenge here...a dry downhill battle. Keisuke will most likely have the jump on you in the beginning. But, the outcome for you will probably be the same as with Kenta...you'll pass him almost directly after that. Again, I stress the same techniques that you used in the previous two battles in order to beat Keisuke.
Coming up: Akina
|
 |
|
|
|
|
|
|
|
|
|
|
|
|
|
Posted: Wed Mar 02, 2005 10:39 pm
Akina
Welcome to Akina. Now, at first glance, this course seems a bit like Akagi, in that it's pretty straightforward with only a few things to really worry about. Thing is, this is totally not the case. Akina is hailed by some as an extremely technical course, worthy of "Expert" ranking.
Your first race is against Iketani on the UH. Simple enough here. Learn to turn early and remember, stay off of the walls. The same goes for racing against Kyouichi. One thing on the UH is that you're going to recognize that turning early is the way to go if you want the right line for Akina UH.
The key points here are of course, the four consecutive hairpins. You'll need to stay a gear lower than your top gear for these...just clear them cleanly and try and get yourself as close to the apex as you can. Your line is important here.
The other major point here is the LHOD (RHOD going Downhill). The same techniques will apply for this turn in the DH...which I'll elaborate on in the following DH section.
Ok, for DH, you're going to need to remember a few key points as well. The first is the second hairpin in section 1, the one that comes right after what looks like a left-right combination. For this turn, you're most likely going to have to off-throttle a bit during the left-right combo in order to set yourself up for the correct line for the left hairpin. Once you've reached the hairpin, brake, downshift, release the brake, and turn in. Remember: NEVER hold the brake while turning!
The next two hairpins in section 2 should be taken in the same slow manner. However, the 2nd of the two is very crucial, as the straightaways are very long after that turn. It is imperative that you do NOT touch any walls during this turn.
The next few straightaways are essentially easy. Long straight goes into sweeping left, followed by a quick right, a longer left, a right...etc. For the most part, if you're uncomfortable doing this section (i.e. you've got problems with tapping through this part), don't be afraid to off-throttle. This will help you gain traction with your car.
After those consecutives comes the make-or-break part of Akina: the Right Hand of Death. Essentially, the Right Hand of Death precedes the longest straight in all of Akina. A tap here messes with acceleration. Take this hairpin like you would any other, but pay extra attention to where you're turning in and how fast you're going in. In fact, you'll want to turn a bit earlier than you should...that's usually the problem with most players on RHOD...the turn-in is earlier than what most would think.
Now, enjoy the next set of straightaways as you cross the next checkpoint...you won't have to worry about anything until you come up to the next left hairpin (watch your map for it). What you want to do is line up on the right side as best as possible. Brake, downshift, turn in, and accelerate at apex as you always do. The room for exit here is wide, but cleanliness is still required, as the straight is still fairly long.
Soon, you'll be coming up to the famed four hairpins (five in the anime, but for here, we'll refer to them as the 4 hairpins). Notice that there are yellow stripes along the left side of the road; three of them to be precise. Just before the third set, brake and downshift and aim for the first hairpin. The key here is to exit each as cleanly as possible, always. Notice that the 4th one has a gutter which is vital to top exit speeds. If you're not good with guttering, though, stay away from it until you get good with it.
After the four hairpins, pass the next checkpoint. Brake for the upcoming right hairpin and off-throttle the next left hairpin (advanced technique: if the car doesn't understeer much, IIRC, one can full-throttle through with eraser on the next turn). The next point is the last right-hand turn of Akina DH. Brake, downshift, turn-in, yadda. Clean, though! This turn is vital, as the majority of section 4 is the long straight at the end! You'll need all the acceleration you can get!
The rest to remember comes with the last two curves of Akina DH. The left bend requires an eraser, otherwise, full-throttling it will understeer. If you need to learn how eraser works...doing it here is simple enough. The right turn requires semi-off-throttle in order to get the right line for it; otherwise you'll eat wall.
And there you go. Akina in a nutshell.
|
|
|
|
|
|
|
|
|
|
|
|
|
|
|
|
|
|
Posted: Thu Mar 10, 2005 1:24 pm
Seeing as no one has been touching this for awhile, I'll write the Irohazaka guide and then take on Shomaru later... Irohazaka/Iroha SlopeAlot of people fear this course just at first glance because the "Expert II" Ranking they give it in Ver.2 but don't let that fool you, this was the first course I played on and first that I mastered. Iro consists of medium speed straight aways and low speed hair-pins with few technicals drifts required. There is so many tricks to beating Iro I couldn't possibly show you them all without making a video, so i'll just write the basics... The First Turn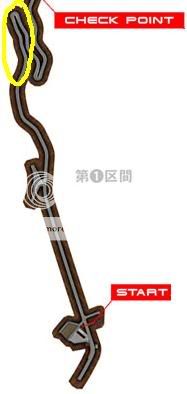 Okay this is a picture of the starting line, most people I've seen play either ******** this up horribly or are so good they know how to do it. Basically you want to go full throttle and you'll get to about -- or in 5th gear depending on how tuned your car is, by the time you reach the begining of the yellow circle, once you hit that spot down shift, you'll be thinking "Why'd I do that!? Theres more road to go!" -- WRONG! the thing is with Iro, you barely get out of 4th gear past this point. Once you hit the yellow circle you will be at about 140, throw to 4th gear, and swing to the left hand side of the road, down shift again right before the turn, and take it from the outside in braking slightly and letting off the gas, then floor it as soon as you clear over 60% of the turn. You should be able to get it back up into 5th gear before the next turn, repeat the same style on this turn and there will be a straight away. Dealing with hairpins & Big Jumps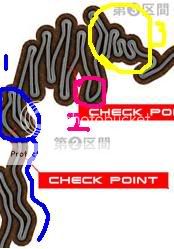 Always remember in this part, DOWNSHIFT AND BRAKE! ONCE YOU GET TO THE START OF A LARGE CHAIN OF HAIRPINS, DO NOT UPSHIFT, STAY IN THE SAME GEAR UNTIL YOU HAVE A STRAIGHT AWAY OR YOU WILL CRASH!! Okay this takes part directly after the straight away, following the blue arrow until you reach the first "double hair-pin" you will be receiving them for almost the entire remander of the course, follow the same tactics, take the outside in. Once you start seeing alot of trees and a wide open road the slowly tilts down you better thinkin quick, on the map its the section in pink, as you take the turn inside the pink circle, take it outside in, AND DO NOT BRAKE! Lightly let off the gas as you turn in and before your even 25% of the way out floor it. I have won countless racing because idiots who don't know this, you will not crash. Coming up quickly will be the area in yellow, this section is full of jumps, the first comes along the edge of the next hair-pin, downshift and brake lightly before you even get near the turn, you will see an opening in the fence and you can jump it! Every single turn in the yellow section is a jump, after the second jump, kick it to second gear and slip through ALL OF THEM! The final stretch -- BOLT IT!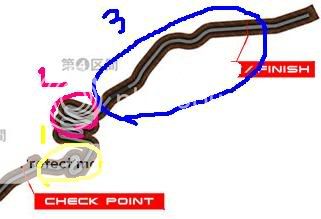 Okay this is it the final stretch! in the section in Yellow the duel hair pin is a trick, if you are good with the steering wheel you can almost one hand this, downshift heading in, and lightly let off the gas, completely throw the wheel in the opposite direction once you clear the first, and floor the gas, upshift and fly out of the corner at an extremely high speed, you'll loose many oppenents in this. Moving into the Pink Section follow all of the same hair-pin rules, DOWNSHIFT, BRAKE, AND DON'T UPSHIFT TIL A STRAIGHT! You should make it out fine! The final Section, The Blue Section, basically, bolt it to top speed and dont look back, don't even think about it, just run your hardest, if your neck and neck, this is all about the car power. If you wanna be a jack a** this stretch is easy to block in because the road isn't very wide... AND THAT CONCLUDES IROHAZAKA/IROHA SLOPE! GOOD LUCK AND GO KILL SOME BITCHS!
|
|
|
|
|
|
|
|
|
|
|
|
|
|
|
Posted: Wed Mar 23, 2005 2:44 pm
Akina Snow
The dreaded Akina Snow. AWD cars will rejoice at how powerful their cars perform here. FR, FF, and especially MR drivers...well...tough luck. This one may be a challenge for you.
Essentially, you're going to have to learn how to do the turns here on Akina Snow. Most AWDs can do a simple brake, downshift, and turn-in. However, doing it too fast will result in wall raping once more. What you want to learn to do is gently turn the car in and not turn all the way. Accelerate at apex and you should have the right lines.
Advanced players can use the machine gun technique to clear the hairpins. Downshift to 3rd and at apex, upshift back to 4th. Keep in mind, though, your car may end up going almost completely horizontal, so you're going to need to countersteer very much.
Other than that, just follow most of the techniques used to play on Akina DH. You should be fine. Just take everything slow and clean. Miki is really no challenge.
(Note: I am, in no ways, a Snow expert. I just know the bare basics enough to get a 27. I'll talk with my buddy...he does a 22.)
|
|
|
|
|
|
|
|
|
|
|
|
|
|
|
|
|
|
Posted: Sun Mar 27, 2005 8:53 pm
Happogahara
Well...the guide for Inbound is in a different thread, so just go to that one for the last two rivals. However, Outbound is a different story. I, personally, dislike Happo OB...the rhythm of it doesn't feel right to me. As best as I can, I'll give you the tips necessary to defeat your rival on Happo OB.
First off, you'll be starting on the right side, so immediately, you lose lane advantage. Don't worry about that, as he's fairly easy to pass. Keep watch of your map and where you're going. All that matters is to take everything clean.
There are a few points at which this becomes relatively easy. If you're doing the course well enough, look to pass at these three turns (if you're having trouble doing it during the course. If you're good enough, you can pass him within the first 3 curves of Happo OB). The first is the noted "b***h turn" in section 1. It looks like a semi-circle, yes. The area is wide. If you do the turn correctly, you'll be able to pass him, no problem.
The next two come in section 3, a bell-shaped curve. Line up on the outside and make sure your line is correct. This turn can be full-throttled easily. The last one is a V-turn (literally, a V). Line up on the outside again and aim for the apex. Just be careful that when you enter, you don't stay too far to the right, because the extra lane that opens up is only there for so long.
After that, make the right hander and proceed towards the snake hairpins. Going through the hairpins, double downshift and just take your line as best as possible. Through the first one, brake and double downshift. The next one (a left), tap your brake (eraser if you can) if the car is prone to understeer; off-throttle if not. Through the next right, do the same as you did for the left. However, after that last right, the left that ends the hairpins comes up really quickly. Quick hands are a must for this turn. Eraser is almost necessary for this turn here as well as the cleanest exit possible, as the straights are long after this turn. Cross the checkpoint and head to section 3.
In section 3, you'll encounter those "hook turns" that I've talked about. Brake and downshift for them. You'll have to turn more than you realize, as the radius of each turn is more than 180 degrees. Coming up after the left is a tight right turn. Line up on the outside, off-throttle, aim for the apex, and accelerate as soon as you've gone past the apex.
From there, go through the first few consecutives with full-throttle. There's only one you need to worry about, and that's a tight left that comes at the end. Watch your map for it! (I'll post a map of it later).
Cross the CP and continue into section 4. In section 4, the first thing that will get you are the quick consecutives that come after. If you don't feel comfortable doing them, off-throttle through some of them. Don't keep a heavy foot on the pedal, and don't stomp the living hell out of it. If you have to, downshift to keep your RPMs up.
There's Happo OB in a nutshell. Happo IB's in the other thread, so I suggest you look there in order to get it right.
(And if you have any other technical questions about Happo IB, I'm open for IM. IB is my specialty.)
|
|
|
|
|
|
|
|
|
|
|
|
|
|
|
Posted: Tue Mar 29, 2005 3:06 pm
Hey where's Shomoru? *loves Shomoru* That's my best course!
|
|
|
|
|
|
|
|
|
|
|
|
|
|
|
|
|
|
Posted: Tue Mar 29, 2005 11:21 pm
RyosukeTakahashi Hey where's Shomoru? *loves Shomoru* That's my best course! I'll be writing that once I get back into the swing of it, i'm in Hawaii right now and I got a couple good times, but they were againist other people so no score =\ I do think I ran a 3:24 on OB, Wet, Night, with my ROADSTER full A tune w/ "2" steering.. ... hmmm
|
|
|
|
|
|
|
|
|
|
|
|
|
|
|
Posted: Wed Mar 30, 2005 7:11 pm
I might make Shomaru a joint collaboration between myself and Outlet...seeing as there are key points to beating the rivals in the course.
EDIT - Hell, Outlet can take all of IB. I dread IB. OB, though, I can provide some tips...when Outlet gets back, that is. Outlet, if you're reading this, IM me and we'll work out who gets to do what for Shomaru.
|
|
|
|
|
|
|
|
|
|
|
|
|
|
|
|
|
|
Posted: Tue Apr 12, 2005 5:05 pm
Ok...I'll give some input now. If more can be added later from friends, then I'll add it in. ShomaruWelcome to Shomaru, the 1st of the new courses to race (Akina Snow is a new condition, but it's the same Akina course). If you hated Happogahara, you'll loathe Shomaru.  Note: Outbound starts at the bottom. Inbound starts at the top. Ok, your first race is against Nobuhiko in his Altezza. Simply put, Nobuhiko's going to give any novice racer a bit of trouble, as his Altezza has a big rear end and he gets start-up on you due to having the left lane. Just stay behind him for the time being and you should be alright. By now, you've probably already noticed that Shomaru is just insanely tight, narrowing the possibility of anyone really being able to pass through Shomaru. That's where the circles on the map come in. The four places that I've circled are key points as to where an opponent, if you're right on his tail and your speed is faster, can be passed. There are other places where an opponent can be passed, however, the ones I've circled are probably the easiest places to pass when it comes down to it. For now, just stay behind Nobuhiko until you get to CP1. Try and stay off of the walls as much as possible. Any wall tap will hurt you greatly. Stay towards the right until you reach CP1. Once you pass CP1, the area becomes very wide for a few meters. This is where to make your move, if you can. A lane opens on the right, which you can use to pass. If you're good, though, go to the left and pass him at the apex of the next small curve. If you don't pass Nobuhiko there, then your next opportunity comes in CP2 (the next circled part). After the V-turn, the left curve opens up a bit more and allows for passing there. Make your next move there. If not, don't fret. CP3 offers the W-turn, where passes are possible. On the last bend of the W-turn, a ram-pass can be made. Squeeze in on the inside. Just be careful that you don't hit the wall too hard and screw up. The last major passing point is right after CP4. Again, the road opens up just a bit, allowing for one last pass. After that, you'd better hope that you can pull something out. As for Inbound, take lots into consideration against the Cappuccino: It's wet and you can get start-up on the Capp. Hence, run this one like you would a TA. Just stay in front the entire way. You may have to brake a bit more for most of the course as it's gonna be...well...really wet. And the thing about Shomaru is that if you don't keep the best line, you're almost guaranteed to wall-tap, and on Shomaru, wall-tapping penalizes greatly.
|
|
|
|
|
|
|
|
|
|
|
|
|
|
|
Posted: Wed Apr 20, 2005 8:29 pm
TsuchisakaPrepare for the quick turns of Happogahara combined with the speeds of Akagi! Version 3's most welcomed new course is the stage for many battles. Ok, let's start with the Outbound.  On the Outbound, you'll face off against three opponents. The first two are selectable from the start: Kyoko and the Man in the Evo 5. Let's start off with Kyoko. Kyoko shouldn't be too big of a pain, really. The only noticeable thing is really that she'll most likely get start-up on you, even though you're in the advantage lane. Don't worry about that at all. For Tsuchisaka's first left turn, don't off-throttle or anything. Take it with full throttle and go for an in-in-out line. The next big left turn, if you want to be safe, tap your brake and guide your car through the turn. It's not necessary, but you'll have to have a pretty good line to do it with just off-throttle. After that is a weird radius right turn. For beginners, half-off-throttle until you've gone through most of it, then throttle through. If you can, eraser through this turn. Cross CP1 (by now, you should've passed Kyoko and, when it comes to it, Man in Evo 5). Shortly after the first checkpoint will be a left turn. Pending who you're racing against, there will be oil there. A run against Kyoko will not have any oil there, so use the extra room to your advantage. Against the Man in Evo 5, however, you'll have to modify your line a little bit. Beginners, tap your brake upon turn in and aim for an out-mid-out line. Do not touch the oil early on or else you will crash and lose much speed and acceleration. After the oil turn comes a right turn with what seems to be a weird box shape. Don't worry about it; treat it like you would any other turn. However, make sure that you don't wall-tap at all. The straights after this turn are relatively long and you'll need whatever straightaway speed you can get. After the straights comes the most important turn in the entire course: a left-right combo that leads into Tsuchisaka's longest straight. When entering this turn, line up on the right (for the left kink). Off-throttle early and guide your car into the left turn. Tap your brake just a bit once you're a bit into that left turn and guide your car through the right kink. After this turn, be sure to re-guide your car back onto the straight, because it curves left a bit. This combo is key, because any touch of the wall will put a damper on your acceleration, which is necessary for this part of Tsuchisaka, the longest straight of the course. Cross the checkpoint and go through section 3, which consists mostly of straights, up until the tunnel. After the tunnel comes the hardest part of Tsuchisaka: the rollercoaster. Leading into it, don't off-throttle until you go through the long left that's after the tunnel (On the picture, you'll see it after the 300 m tunnel). Off-throttle there a bit and brake HARD. Do not downshift, though, as it's not necessary. What you're aiming to do here is cut each of the separate apexes, driving as straight a line as possible. Do this through all of the rollercoaster consecs and you should be fine. After that, full throttle through the rest of the turns until you get close to the end. Notice the three turns that form somewhat of a rounded "M" shape? For the first right kink, off-throttle. Tap the brake and guide your car through the left one, then throttle through the last right one. After that, you should be done with Tsuchisaka. Notes on facing Keisuke here: Do the same things as you would, but make sure you block him off early. Unlike Kyoko, he doesn't take the front as eagerly. And yes, there's oil when you race him. There isn't oil only when you're racing in the rain or facing off against Kyoko or Ryosuke in dry. On the Inbound, you're going to face off against Ryosuke, the Man in the Evo VI, and finally, Takumi (once you've gotten past Keisuke on OB). Ok, note here that the consecs come really early and these may throw you off. On top of that, Ryosuke, the Man in the Evo VI, and Takumi will most likely get the jump on you unless you manage to cut them off in the beginning. Other than that, you're going to have to play chaser. Pay special attention during the beginning, as you'll hit the rollercoaster early. You still won't need to downshift for the rollercoaster, just know when it's coming and brake hard. Now, remember how the rollercoaster had three left-right combos, each increasing in tightness? Now, they come in reverse order. Watch the first left. Brake hard for it and enter cleanly. By the tunnel, you should be well ahead of Ryosuke. From there, run the rest of the course cleanly. The key points on the map above (minus the beginning of the rollercoaster) are still key points here. Take 'em all cleanly.
|
|
|
|
|
|
|
|
|
|
|
|
|
|
|
|
|
|
Posted: Sun May 01, 2005 11:40 pm
Alright, the LOTS For Dummies Guide has been completed. Feel free to add any questions as we go along. We'll probably keep updating it as we see fit with more info to help the newest players get through LOTS.
|
|
|
|
|
|
|
|
|
|
|
|
|
|
|
Posted: Mon Jul 11, 2005 11:31 pm
One question.....86.....or fc?
|
|
|
|
|
|
|
|
|
|
|
|
|
|
|
|
|
|
Posted: Mon Jul 11, 2005 11:52 pm
jdUb4 One question.....86.....or fc? I'm not quite sure that I understand the question. 86 or FC for what?
|
|
|
|
|
|
|
|
|
|
|
|
|
|
|
Posted: Mon Jul 11, 2005 11:59 pm
actually... i feel that LOTS is veri simple... as long as u dun crash into the walls... its ok... its hard to describe how to play ID... everyone has their own playing style...
|
|
|
|
|
|
|
|
|
|
|
|
|
|
|
|
|
|
Posted: Tue Jul 12, 2005 2:07 pm
Hamester actually... i feel that LOTS is veri simple... as long as u dun crash into the walls... its ok... its hard to describe how to play ID... everyone has their own playing style... Indeed, yes. This guide is for those that may not get the hang of ID quite easily. Basically, it's a guide on what to watch out for.
|
|
|
|
|
|
|
|
|
|
|
|
|
|
|
|
|
|